A Calculated Whisk

Creative paleo and gluten-free recipes

  • Home
  • About Me
    • Photography Portfolio
  • Cookbook
  • Recipe Index
  • Paleo
    • Paleo Eating
    • A Paleo Pantry
  • Blogging
You are here: Home / Archives for recipe

Chocolate Chip Cookies (Paleo, Gluten-free)

July 20, 2013 By Becky 2 Comments

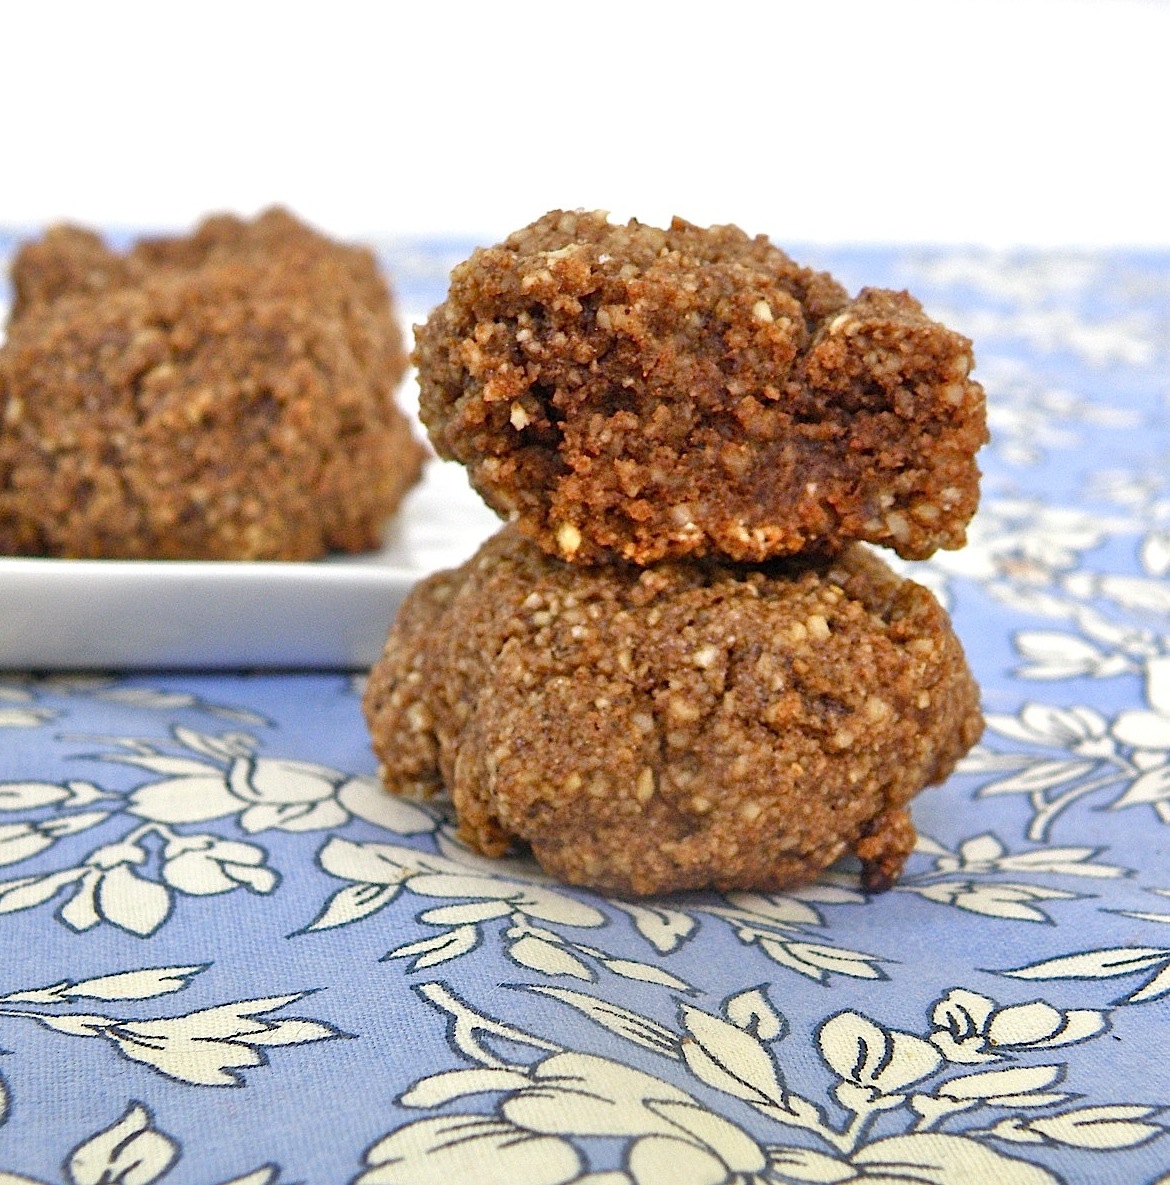
This is it!  My new favorite chocolate chip cookie recipe.  Even if I weren’t doing a month of paleo, I would still make these.  They are SO good–a little chewy, super chocolaty, not too sweet, with a good dose of vanilla.  In other words, perfect.

Several months ago, my friend Audrey emailed me a recipe for chocolate chip cookies with almond flour, which she said she liked better than the real thing.  I was a little skeptical, but finally tried it.  The cookies were delicious, but the recipe had no egg, and I found that the cookies fell apart easily and were a little too flat.  I tried again with a couple of eggs, which resulted in much sturdier cookies that were also delicious, but very cakey.

Hoping to strike a balance between too cakey and too flat and fall-aparty, I tried a third time.  As often happens, the third time was the charm!  I hope you make these cookies.  You won’t miss the flour or the sugar (and they don’t taste like honey).  They are really easy to make, and not that bad for you!  Do it!

Note: the main reason I chilled the dough here is because I wanted to leave the kitchen before I started preheating the oven (it’s 100 degrees today!).  So, you can stay mostly cool and still make these cookies.  Try them!  You know you want to.

Ingredients (makes about three dozen small cookies):

8 tablespoons grass-fed butter
1/2 cup honey
1 and 1/2 teaspoons vanilla
Scant 1/2 teaspoon salt
1 egg
1/4 teaspoon baking soda
3 cups almond flour
7 ounces bittersweet chocolate, chopped (paleo chocolate exists, but I couldn’t find any…so technically my cookies are just ALMOST paleo)

In a large bowl, cream the butter with a fork until smooth.  Add the honey, vanilla, and salt and stir until very smooth, then add the egg and stir to incorporate.  Add the baking soda, almond flour, and chocolate chunks and stir until combined.  Refrigerate the dough for up to 30 minutes if possible.

Preheat the oven to 350 and line 3 baking sheets with parchment paper (or if you don’t have three, like me, bake in batches–just be sure to let the cookie sheet cool between batches).  Scoop tablespoon-sized balls of dough onto the sheet, flattening them a little if you like a flatter cookie.  They don’t spread much while they bake, and will be adorably domed if you leave them alone, but I flattened some because I am planning to make ice cream sandwiches.

Bake for 8-10 minutes, until golden brown on top but not burned on the bottom.  The cookies will be unstable, and need to cool on the pans for at least five minutes.  After that, carefully transfer them to a rack to cool completely.


Filed Under: dessert, gluten free, paleo, recipe Tagged With: almond flour, baking, chocolate chip, cookies

Paleo Poached Eggs with Creamy Spinach

July 18, 2013 By Becky 4 Comments


Okay, big news. A Calculated Whisk is going paleo for one month. There. I said it. Now if I go and try to post some kind of insane ice cream cupcake cookie sandwich, you guys will call me out on it. Right?

Nobody tells you this, but the ugly downside of starting a food blog is you EAT so much of the delicious food you make that your figure kind of falls by the wayside. I love desserts, obviously, but you can only have so much. It’s time for a change. In the past I’ve lost a lot of weight following the Zone diet, but this time I wanted to try something different.

I’ve been hearing so much about paleo, and it makes sense to me that eating the foods we evolved eating would be the healthiest way to go. I checked out this website for the Whole 30, and thought I would give it a try. I got The 30 Day Guide to Paleo Cooking: Entire Month of Paleo Meals, and I’m ready to go. The book is great, but I always think it’s more fun to create my own recipes. So, here it is! My first paleo breakfast. It tastes great, and I didn’t feel like anything was missing since it’s so filling, rich, and creamy.

Oh, and by the way! I’m on an exercise program, too. I’ve started barre3‘s 28 to Great. That’s six days of workouts a week (they have an awesome online library of 10, 30, 40, and 60 minute videos) for four weeks. I’ve done two workouts so far, and they are exhausting. It’s really targeted muscle work and I can tell it’s going to have an impact.


Phew.  This is a lot of changes, but I hope you guys will support me and try some of the recipes.  Let’s start with the most important meal of the day.
 
Ingredients (serves one):
 
2 teaspoons coconut oil, plus extra
2 eggs
2 cloves garlic, minced
2 cups baby spinach (or more!)
2 teaspoons coconut milk or cream
Salt and pepper to taste
 
In a large skillet, heat the coconut oil over medium low heat.  Add the garlic and saute until it starts to brown.  Turn the heat up to medium high, add the spinach, and season with salt and pepper to taste.  Cook the spinach, tossing frequently, until just wilted, 3-5 minutes.  Turn off the heat and stir in the coconut milk or cream.
 
Meanwhile, poach your eggs.  See this post about how to do it on Smitten Kitchen, or use an egg poacher.  I greased the cups of my egg poacher with a little bit of coconut oil.
 
When the spinach is ready, make it into a nest on your plate.  Slide the finished eggs into the nest, sprinkle with more salt if desired, and serve hot.
 

This post contains affiliate links. As an Amazon Associate I earn from qualifying purchases.

Filed Under: breakfast, paleo, recipe, vegetarian, whole30 Tagged With: coconut, dairy free, eggs, five ingredients or less, healthy, low carb, spinach

Blackberry, Almond, and Rocket Salad with Fresh Mozzarella

July 17, 2013 By Becky 4 Comments

Did you know that arugula is called rocket in the UK?  Arugula is a pretty fun word, but rocket is even better.  This salad has rocket in it, along with all the other delicious things listed in the title.  After making blackberry cupcakes for this month’s Get Your Chef On challenge, I wanted to do something else fabulous with the rest of my juicy blackberries.  I dreamed up this salad, and thought about it all day during class.

I was happy to find that it was even better than I had imagined!  The spicy arugula, sweet blackberries, creamy mozzarella, and toasty almonds are the perfect combination.  This is my new favorite summer salad.  Ben loved it, too!  When I served it he said it looked fancy (secret–any salad with blackberries looks fancy!), and then he asked for seconds.  Usually he’s a one plate of salad kind of guy.

So, here’s what I would recommend.  Go buy a lot of blackberries, make these cupcakes, then make this salad.  A light dinner with a decadent dessert is the perfect thing to have on a summer evening.

Ingredients (serves 2):

1/2 cup sliced almonds
3 cups arugula
2 teaspoons olive oil
1 teaspoon balsamic vinegar
Pinch of sea salt
1 heaping cup blackberries
4 ounces fresh mozzarella, roughly cubed

Toast the almonds in a dry skillet over medium heat, stirring often to make sure they don’t burn, until golden brown (less than five minutes).  Set aside to cool.

Toss the arugula with the oil, vinegar, and salt and adjust seasonings to taste.

To serve, line plate with arugula.  Top with blackberries, fresh mozzarella, and toasted almonds.  Enjoy!

Filed Under: recipe, uncategorized, vegetarian Tagged With: almond, arugula, balsamic vinegar, blackberry, cheese, fresh mozzarella, healthy, low carb, olive oil, salad

Bacon-Wrapped Shrimp with Creamy Rutabaga

July 14, 2013 By Becky 2 Comments

I made you a whole dinner!  This is one of my favorite things to make for my boyfriend–he loves it.  You can also make it with scallops instead of shrimp.  The shrimp or scallops broil wrapped in bacon, which makes them almost impossible to overcook, and they don’t need any other seasonings!  So simple and so delicious.  You only need five ingredients (salt and pepper don’t count)!

If you’ve never tried rutabagas (also known as yellow turnips), I highly recommend them.  This creamy rutabaga is a healthier, more flavorful version of mashed potatoes.  You’re going to love it!  It’s adapted from Ina Garten, and you should check out her version, because it has an amazing crispy shallot topping.  I usually make the crispy shallots, but they take a while and today I was in a bit of a hurry.

I served the shrimp right on top of the creamy rutabaga, with a simple salad on the side.  I plumped some raisins, toasted some pecans, and tossed them with baby arugula, olive oil, balsamic, and a little salt.  The perfect summer dinner!

Ingredients (serves 2-3):

For the bacon-wrapped shrimp:

1/2 pound shrimp (I used 31-40 count per lb), peeled, tails on (or use sea scallops)
8 or so slices of bacon (you need one slice of bacon for every two shrimp or every one or two scallops)
Toothpicks

For the creamy rutabaga:

2 rutabagas
3/4 cup whole milk, heavy cream, or coconut milk
3 tablespoons butter, ghee, or olive oil
Salt and pepper to taste

To prepare the rutabagas, trim and peel them and cut them into 1-inch chunks.  Put them in a saucepan with a generous pinch of salt and water to cover.  Bring to a boil, then reduce the heat and simmer, covered, for about 35 minutes (they should feel tender like cooked potatoes when pierced with a fork).  Drain them, and put them in a food processor with the milk, butter, and some salt and pepper.  Process until smooth.  Taste seasonings and adjust as necessary.

To make the shrimp, preheat the broiler and lightly grease a baking sheet.  Cook the bacon in a skillet over medium heat until it is starting to brown but still very undercooked.  Drain on paper towels.

When the bacon is cool enough to handle, cut each piece in half lengthwise.  Wrap each shrimp with half a piece of bacon, using a toothpick to secure the ends.  If you are using large scallops, you can wrap each one in a whole piece of bacon.  Place the bacon wrapped shrimp on the baking sheet.

Broil for about 3 minutes, then flip the shrimp over and broil for another 3 minutes or until the bacon is crisp and the shrimp are fully opaque.  Scallops may need an additional minute or two if they are large.  Serve hot.

Filed Under: dinner, uncategorized Tagged With: bacon, five ingredients or less, low carb, rutabagas, shrimp

Lemon Cheesecake Truffles

July 9, 2013 By Becky 2 Comments


Truffles are the perfect summer dessert, especially when there’s lemon involved.  You can make these without even using your stove, and since they’re kept in the fridge, they’re refreshing on a hot day.  These truffles have a rich and creamy cheesecake interior with lemony undertones, a snappy chocolate shell, and crunchy, zesty lemon sugar on top.  They are so rich that I feel satisfied with just one or two for dessert.
 
You should make these because they are much easier, cuter, and smaller than cheesecake.  You can impress your friends by presenting all the delicious flavors of cheesecake in a small, round, chocolate-dipped form.  And in case you’re wondering, lemon and chocolate DO go together well.  It’s like orange and chocolate, but punchier and more summery.  Try it.  Try it today!


Ingredients (makes about 15 truffles):

For the cheesecake filling:

1 lemon
8 ounces cream cheese
Pinch of salt
1 cup powdered sugar
A few drops of vanilla

For the topping:

3 tablespoons granulated sugar

For the chocolate coating:

7 ounces bittersweet chocolate, chopped
1/2 teaspoon vegetable oil
A few drops of vanilla

Zest the lemon.  Set aside half the zest and toss it to coat with the granulated sugar to make the topping.  Spread the lemon sugar out on a plate in a thin layer so it can dry out a little.  You definitely don’t want to skip this part, because the crunchy, zesty sugar is going to take these truffles from delicious to ridiculous.

Place the other half of the zest in a medium bowl with the cream cheese, salt, sugar, and vanilla.  Juice the lemon to obtain three tablespoons of juice, and add them to the bowl, making sure to strain out any seeds.  Use a fork to cream this mixture until well combined.  Cover the mixture and place it in the freezer for half an hour or so to firm up.

Line a baking sheet with parchment or wax paper.  Use a spoon and your fingers to form rounded teaspoon-sized balls of cheesecake mixture and place them on the parchment-lined cookie sheet.  Don’t worry if the balls aren’t perfect, because you will have a chance to smooth them out later.  Freeze the balls for at least two hours so they’re totally firm.

When your truffles are almost frozen, it’s time to melt the chocolate.  Place the chopped chocolate, oil, and vanilla in a microwaveable bowl.  The oil is just there to help make the chocolate coating a little bit shiny.  Microwave the bowl in thirty-second intervals, stirring in between, until almost melted.  Stir until the chocolate is completely smooth.  Set the chocolate aside to cool for a few minutes before you dip your truffles.

Line another baking sheet with parchment or wax paper so you’ll have a spot for your dipped truffles.  Take the truffles out of the freezer.  Working with one ball at a time, roll it quickly between your palms to round it out, then drop it in the chocolate, turning it a little to fully coat it.  Use a fork to carefully fish the truffle out of the chocolate.  Let the excess chocolate drip off, then carefully transfer the truffle to the parchment paper.  Sprinkle the top of the truffle with a little lemon sugar right away.  You don’t want to wait until you’ve dipped all the truffles because once the chocolate is hardened the lemon sugar won’t stick.

Once you’ve dipped all the truffles, place the baking sheet in the refrigerator for about half an hour so the chocolate can set.  When the truffles are set, they are ready to eat.  If you won’t be enjoying them right away, store the truffles in an airtight container in the refrigerator for up to a week.

Filed Under: dessert, gluten free, recipe Tagged With: candy, cheesecake, chocolate, lemon, truffles

Mint Chocolate Chip Ice Cream with Homemade Magic Shell

July 7, 2013 By Becky 2 Comments


Several weeks ago, I made mint chocolate chip ice cream.  It’s Ben’s favorite flavor, and I really like it, too.  It was late at night when it was ready to eat, so we had some, and the next day I asked Ben not to finish it while I was at work so I could get some pictures later.

Well, guess who conveniently forgot about what I said?  It’s all worked out pretty well for him, though, because I just had to go ahead and make more mint chocolate chip ice cream.

It’s also working out pretty well for me, because I just got my hands on a copy of Jeni’s Splendid Ice Creams at Home.  It’s my kind of book!  It has so many delicious and creative ice cream recipes, organized by season.  And, it has lots of recipes for sauces, mix-ins, and sundaes.  It even has a recipe for macaron ice creams sandwiches.  I love it!

Jeni’s ice cream base has a few interesting ingredients (cream cheese and cornstarch, for example), but they result in an ice cream that stays creamy and scoopable day after day.  You have to try this!

Ingredients (makes one quart; adapted from Jeni’s Splendid Ice Creams at Home):

For the ice cream:

1 tablespoon plus 1 teaspoon cornstarch
3 tablespoons cream cheese, softened
1/ 4 teaspoon salt
2 cups whole milk
1 1/4 cups heavy cream
2/3 cup sugar
2 tablespoons light corn syrup
Handful of fresh mint leaves, torn into pieces
1/4 teaspoon vanilla
3 tablespoons green creme de menthe (optional)

For the chocolate chips and magic shell:

7 ounces bittersweet chocolate, chopped
3 tablespoons coconut oil
1/4 teaspoon vanilla

In a small bowl, stir together the cornstarch and two tablespoons of the milk to form a smooth paste.

In a medium bowl, whisk the cream cheese and salt until smooth.

Heat the cream, remaining milk, sugar, and corn syrup in a saucepan over medium heat.  Bring it to a boil, and boil for four minutes.  Remove from the heat, and gradually mix in the cornstarch paste.  Return the mixture to a boil and cook for about a minute, stirring, until somewhat thickened.

Slowly pour the hot milk mixture into the bowl with the cream cheese, whisking until smooth.  Stir in the vanilla, creme de menthe if using, and mint leaves. (If you decide not to use the creme de menthe, your ice cream won’t be green.  You can always add food coloring if you want.)

Refrigerate the mixture for at least four hours to chill and infuse the milk with minty flavor.  When ready to freeze the ice cream, strain out the mint and freeze in your ice cream maker.

To make the chocolate chips and magic shell, heat the coconut oil and chocolate in a double boiler, stirring until melted and smooth.  Stir in the vanilla.  Cool to room temperature before layering with the ice cream.

When the ice cream is done, put a thin layer of chocolate in the bottom of an airtight container.  Add a layer of ice cream, then drizzle on some chocolate.  Keep layering until the ice cream is all packed up, using just about 2/3 of the chocolate.

Freeze the ice cream for at least four hours before serving.

Magic shell should be liquid at room temperature, but can be microwaved if necessary.  To serve, spoon a little chocolate on top of your ice cream and watch the magic.

Magic shell will keep in the refrigerator for three weeks.

 
This post contains affiliate links. As an Amazon Associate I earn from qualifying purchases.

Filed Under: recipe Tagged With: chocolate, ice cream, magic shell, mint, mint chocolate chip

Vietnamese Pork & Vermicelli Bowl

July 7, 2013 By Becky 1 Comment


There are lots of Vietnamese stores and restaurants in my neighborhood.  On lazy days I do all my shopping at Truong Thinh, the Vietnamese market around the corner, and pick up a banh mi for lunch. One of my favorite places to eat is Pho Hoa, where I love to order the House Special Vermicelli Plate (number 90 in case you’re going–Pho Hoa is a chain and there might be one near you!).  It comes with a bunch of delicious things, and rice paper wraps so you can make your own spring rolls.  The first time I ordered it, the waiter brought the rice paper wraps first and Ben and I tried to take a bite of them.  No dice.  They are dry like paper until you soak them in hot water.  Oops.

Anyway, the house special plate comes with those wraps (and a big bowl of hot water to soften them) and vermicelli, herbs and vegetables topped with grilled pork, meatballs, a spring roll, and shrimp & sugarcane.  It also comes with fish sauce on the side.  It’s SO good, and the grilled pork is my favorite.  I don’t know what they do to it.

This dish is my attempt to recreate that dinner at home.  I have to tell you, it’s really good, but it’s not QUITE the same flavor I get at the restaurant.  You should still make it, though.  It’s super yummy and healthy and beautiful (and lots of fun to photograph, if you’re into that).  It has a lot of components, but almost all of them can easily be made in advance.  When it’s time to eat, just cook the pork and put together your bowl!

 
Ingredients (serves 4; adapted from The Culinary Chronicles):
 
For the pork:
 
5 cloves garlic, minced
1 shallot, minced
2 scallions, sliced
4 inch piece of lemongrass, finely minced
3 tablespoons cilantro, chopped
1 tablespoon brown sugar
1 tablespoon honey
2 tablespoons fish sauce
3 tablespoons soy sauce
3/4 to 1 pound pork tenderloin, sliced thinly
 
For the quick-pickled carrots and cucumbers:
 
1 carrot, peeled and cut into matchsticks
1 small cucumber, cut into matchsticks
4 tablespoons rice vinegar (no sugar or salt added)
2 tablespoons sugar
Pinch of salt
 
For the nuoc cham sauce:
 
Juice of 2 limes
1/4 cup fish sauce
1/4 cup sugar
3 tablespoons warm water
1/2 teaspoon chili paste
 
For the scallion oil:
 
1/4 cup vegetable oil
1/2 cup sliced scallions (3-4 scallions)
 
For serving:
 
8 ounces vermicelli, cooked according to package directions
1 head of Boston lettuce, leaves separated
Bunch of cilantro
Fresh bean sprouts (I bought them and forgot to get them out!)
Crushed roasted peanuts
 
To prepare the pork, mix all the ingredients for the marinade together and toss with the pork.  Cover and refrigerate for at least an hour before cooking.
 
To make the quick-pickled vegetables, pour the vinegar, sugar, and salt over the vegetables and toss to coat.  Let sit at room temperature for at least an hour before serving.  If you make them more than a couple of hours in advance, store them in the fridge.
 
For the nuoc cham sauce, mix all ingredients together.  Taste and adjust seasonings as necessary.
 
For the scallion oil, heat the oil in a large skillet over low heat.  When it’s hot, add the scallions and cook until wilted but still bright green, about three minutes.  Pour off the scallions and most of the oil and set aside.
 
Take the pork out of the fridge about ten minutes before you want to cook it.  Prepare the grill, or heat up the same skillet you used for the scallion oil over medium high heat.  Cook the pork, with a little marinade spooned on top, on both sides until browned and cooked through.  Brush cooked pork with the scallion oil before serving.
 
To serve, line a plate or bowl with lettuce leaves and vermicelli.  Top with pickled vegetables, bean sprouts, pork, and roasted peanuts.  Serve with nuoc cham sauce on the side.
 

Filed Under: dinner, recipe, uncategorized Tagged With: Asian, dairy free, healthy, noodles, pork, vermicelli, Vietnamese

Brie Omelette with Roasted Red Pepper, Corn, and Fresh Basil

July 5, 2013 By Becky Leave a Comment


We grow a few herbs on the porch, including basil.  It’s so much fun to go out there and grab a few leaves of something for whatever I’m cooking.  Today, I was inspired by the leftover brie and roasted red pepper and decided to make them into an omelette with a little corn.  How could I make this omelette even better? I wondered.

Fresh basil!  I was right.  I think the fresh basil is what takes this from good to great.

A note about omelettes (mine, at least): they are not photogenic.  First of all, I broke my favorite square white plate while getting ready to photograph this.  All the rest of my big plates are yellow, which isn’t the best background for eggs.  But also, I struggle to make my omelettes fold right and look pretty.  Any tips?

I think part of the problem is the fact that I’m too lazy to make one omelette for me and one for my boyfriend, so I insist on making one gargantuan omelette for us to share.  It’s just too BIG to be pretty.

At least it’s not too big to be delicious!

Ingredients (serves 2):

2 tablespoons butter, divided
1/3 cup fresh or frozen corn kernels
1 roasted red pepper*, peeled, trimmed, deseeded, and chopped
4 eggs
Splash of milk
Salt and pepper to taste
3 ounces brie, cut into thick slices
Handful of fresh basil leaves, julienned**

Heat one tablespoon of butter in a large skillet over medium heat.  Saute the corn with a little salt and pepper until heated through.  Add the red pepper and cook for another minute or so.  Put the vegetables in a bowl and set aside.

Wipe out the skillet and heat the rest of the butter over medium heat.  In a small bowl, whisk together the eggs and milk with some salt and pepper.  When the skillet is hot, pour in the egg mixture.

Let the omelette set for a couple of minutes, then add the vegetables (reserving some for the garnish if desired), brie, and basil.  When the eggs are almost set, fold the two sides of the omelette into the middle (I have no tips on doing this elegantly.  Don’t worry, it will taste good even if it turns into a scramble).  Cook for another minute or so, then flip onto a plate, garnish with reserved vegetables and more basil, and enjoy hot.

Share this omelette with someone special!  Or, decide you need the lumberjack special and eat it all yourself :).

*If you have a gas stove, you can roast peppers stovetop!  Place the pepper directly on the burner with the flame on high.  Turn frequently with tongs until it’s collapsed and charred on all sides.  If you don’t have a gas stove, preheat your oven to 500 or your broiler, put a little oil on the pepper, and roast on a cookie sheet, turning frequently, until it’s deflated and well-charred.  Place the pepper in a bowl and cover.  Steaming the pepper like this makes it easier to peel.  When it’s cool enough to handle, peel the pepper under cold running water.  Use in this omelette, or for pasta, pizza, or a topping for cheese and crackers.

**To julienne basil, stack the leaves on top of each other.  Roll them up, and slice into thin strips on the diagonal using a sharp knife.

Filed Under: breakfast, recipe, vegetarian Tagged With: basil, brie, cheese, corn, eggs, omelette, red pepper, roasted red pepper

Patriotic Panna Cotta with Raspberry Coulis and Blueberries

July 2, 2013 By Becky 4 Comments


Have you ever had panna cotta?  It’s a really simple Italian dessert and its name means “cooked cream”.  It comes out kind of like a cross between a flan and a vanilla pudding (read: delicious).

The first panna cottas I made were delicious, but a total fail aesthetically–there wasn’t enough gelatin to unmold them in a shapely manner, and the fruit curds I layered in weren’t helping at all.  But, this version is just as delicious and much nicer to look at.

Here I’ve paired panna cotta with a delicious raspberry coulis and some fresh blueberries for a special Fourth of July treat.  Panna cotta is also delicious on its own, or with chocolate sauce.  There are lots of other flavors of panna cotta that I’m dying to make (well, mainly mocha!) but that’s all for another day.

For now, impress your friends with this elegant and easy Independence Day dessert!


Ingredients for the panna cotta (makes 4-6 servings; adapted from David Lebovitz):

1 1/2 cups heavy cream
1/2 cup 2 % milk (or use all cream)
1/4 cup (4 tablespoons) sugar
1/2 vanilla bean
3 tablespoons cold water
1 packet plain gelatin
Butter for greasing ramekins

Ingredients for the raspberry coulis (makes about 1 cup):

1 1/2 cups fresh raspberries
1/3 cup sugar
Pinch of salt
1/4 cup water
1 teaspoon kirsch or framboise liqueur
1/4 teaspoon vanilla
1 tablespoon cornstarch (optional)
1 tablespoon cold water (optional)

For serving:

2 cups fresh blueberries

Place the cream, milk, and sugar in a medium saucepan.  Scrape in the seeds from the vanilla bean, and drop the pod in, too.  Cook over medium heat, stirring often, until the sugar is melted and the mixture is hot but not boiling.  Turn off the heat, cover the pot, and let the mixture infuse for half an hour.

Lightly grease individual ramekins with a little butter if you’re planning to unmold your panna cotta to serve (this is not necessary if you plan to serve it still in the cups).  If your molds hold half a cup, you will need four of them.  If they’re smaller, you might be able to fill 5 or 6.

In a medium bowl, sprinkle the gelatin over the cold water.  Let it sit for about five minutes.

Meanwhile, remove the vanilla pod and heat the cream back up until hot.  Pour the mixture (through a sieve if desired) into the bowl with the gelatin and stir until the gelatin is completely dissolved.  Divide the mixture among your molds and refrigerate, covered, for at least two hours before serving.  Panna cotta will keep in the fridge for up to a week.

To unmold, dip the bottom of each ramekin in hot water for ten seconds, run a thin knife around the edge, then invert onto a plate.

To make the raspberry coulis, place the raspberries, sugar, salt, and water in a saucepan over medium heat and cook until the sugar is dissolved. Strain the mixture, discarding the solids, and stir in the liqueur and vanilla.  If you would like a thicker coulis, mix together 1 tablespoon cornstarch with 1 tablespoon cold water until smooth.  Return the raspberry mixture to the saucepan, add the cornstarch paste, and bring to a boil while stirring constantly.  Cook and stir for one more minute, then remove from the heat.  Cool to room temperature before serving with panna cotta.  Store coulis in the refrigerator for up to one week or until ready to use.

To serve, invert the panna cotta onto a plate, surround with coulis, and sprinkle with fresh blueberries.

Filed Under: dessert, gluten free, recipe Tagged With: blueberry, cream, fourth of july, gelatin, holiday, panna cotta, raspberry, raspberry coulis

Dairy-Free Lemon Curd

June 25, 2013 By Becky 24 Comments

 
Dairy-Free Lemon Curd
 
This dairy-free lemon curd is a lighter version of the classic. It’s still packed with irresistible sweet citrus flavor!
 
My dad and sister came over for dinner this weekend.  It was so much fun–my sister just turned 15, and she had never been to my apartment before!  I cooked them a belated birthday/father’s day celebratory dinner.  
 
We had thai shrimp curry with vegetables and coconut milk (so good–recipe coming soon), a salad my dad brought with a delicious dressing (I’ll try to score the recipe and post it–it involves hazelnut oil!) and a berry tart with coconut cream and dairy-free lemon curd.  My sister can’t eat any dairy, so I had to make lemon curd without the butter.  Good news–it’s just as delicious as the original, and even more lemony.
 
Dairy-Free Lemon Curd
 
I wanted to share the whole tart recipe with you, but the crust still needs some work.  Anyone have a good dairy-free tart crust recipe?  I’m going to work on getting one ready for the Fourth, because this tart happens to be very patriotic.  For the topping, we just whipped up some coconut cream with powdered sugar and vanilla, then folded it in to the lemon curd.
 
Dairy-Free Lemon Curd
 
Anyway, I couldn’t wait to share this delicious lightened-up lemon curd with you.  It’s a healthier way to enjoy my favorite spread!  Try it on pancakes or a dutch baby, swirl it with some greek yogurt, or pipe it inside some cupcakes.
 
If you’re looking for the original buttery version, it’s here.
 
Dairy-Free Lemon Curd

Dairy-Free Lemon Curd

Yield: 1 1/2 cups
Prep Time: 10 minutes
Cook Time: 15 minutes
Total Time: 25 minutes

This dairy-free lemon curd is a lighter version of the classic. It's still packed with irresistible sweet citrus flavor!

Ingredients

  • 4-6 organic lemons
  • 
1/2-3/4 cup sugar, to taste
  • Pinch of salt
  • 
2 eggs
  • 1 egg yolk
  • 1/2 teaspoon vanilla extract (optional)

Instructions

  1. Wash your lemons really well, and zest two of them. Mix the zest with the sugar in a small bowl, rubbing the mixture between your fingers to bring out the flavors of the zest (use 1/2 cup of sugar for a very puckery curd, and more if you want things a little sweeter). Set the lemon sugar aside (if you want to make extra lemon sugar, it's also delicious as a topping for muffins or cookies).
  2. Roll the lemons firmly under the palm of your hand to prime them to release the most juice. Juice lemons until you have 3/4 cup of lemon juice. Strain out any seeds. Add the juice, lemon sugar, and salt to a saucepan. Warm over medium heat, stirring constantly, until all the sugar is dissolved.
  3. Beat the eggs and egg yolk together in a medium bowl. While whisking constantly, slowly pour the warm lemon mixture into the eggs. Continue to beat for a minute or so.
  4. Return the mixture to the saucepan and cook over low heat, whisking constantly, until the mixture thickens, about 10-15 minutes. Remove from the heat and stir in the vanilla (the vanilla is optional--you won't really taste it, but it rounds out the flavor).
  5. Let the curd cool to room temperature, then transfer to a glass jar or another airtight container. Store in the refrigerator. Lemon curd will keep, refrigerated, for up to two weeks.

Notes

Recipe adapted from Genius Kitchen

© Becky Winkler
Cuisine: British

Filed Under: breakfast, dessert, recipe Tagged With: dairy free, lemon, lemon curd, preserves, spread, tart

Salted Caramel Cupcakes

June 21, 2013 By Becky 16 Comments


Okay, this is it!  My best cupcake ever.  If you haven’t jumped onto the salted caramel train yet, now is the time.  These are light and delicious vanilla cupcakes (my new favorite white cake recipe) filled with salted caramel sauce, topped with salted caramel buttercream, and sprinkled with a little more sea salt to finish.  They’re amazing!  I recommend that you make them right now.  If you prefer, you can use chocolate cupcakes as the base–I tried that, too, and it’s also amazing.


To make these, you’ll need to some salted caramel sauce.  You might want to make a double recipe so you can stash some in the fridge or drizzle it over ice cream.  If you make a single recipe, it should be just enough to fill the cupcakes and make the frosting.

You’ll also need cake flour.  I know, I also wish all-purpose flour could really be used for all purposes, but this time you’re going to need the cake flour.  It makes the cupcakes really light and gives them a nice fine crumb.  If you don’t have any cake flour but you do have cornstarch, use this post from Joy the Baker and turn some of your regular flour into cake flour.

I made these for an event we had at my Quaker meeting last night.  Every Wednesday in the summer, my meeting hosts a Wellesley Wednesday cookout, where everyone brings something to share and then someone presents on an interesting topic.  Well, yesterday, the interesting topic was THIS BLOG!  I had so much fun telling everyone all about A Calculated Whisk and how it all works–some of them did not even know what a blog was!

After the discussion, we made frosting together!  I showed everyone how to stuff a cupcake with salted caramel, and how to use sugar, butter, a little milk and salt, and flavorings to make a delicious small batch of buttercream.  I brought all kinds of fun things for people to flavor their frosting: grenadine, vanilla, vanilla beans, cinnamon, cocoa, almond extract, peppermint extract, salted caramel, and lime and lemon zest.  We had a blast!

Salted Caramel Cupcakes Recipe
Yield: 20 cupcakes
Prep time: 25 minutes
Cook time: 20 minutes

Ingredients for the cupcakes (adapted from this recipe at Cookies & Cups):

1 3/4 cups cake flour
1 1/4 cups all purpose flour
1 3/4 cups sugar
2 1/2 teaspoons baking powder
1/2 teaspoon salt
1 cup butter (2 sticks), at room temperature, cut into chunks
4 eggs
1 cup milk (I used 2%)
2 teaspoons vanilla

1 cup salted caramel sauce, for filling

Ingredients for the frosting:

1 cup salted caramel sauce
4 cups powdered sugar, sifted
1/2 cup unsalted butter (1 stick), at room temperature
1/4 teaspoon salt
1 teaspoon vanilla

To make the cupcakes, preheat the oven to 350 and line your muffin tins with paper liners.

In a large bowl, combine the flours, sugar, baking powder, and salt.  Use a mixer to beat the mixture on low speed for about a minute to make everything light and fluffy.

With the mixer still on low, add the butter a couple of pieces at a time.  Mix until it looks like coarse sand.  Slowly pour in the milk and vanilla and mix until combined.

Add the eggs one at a time, mixing all the while and scraping down the sides of the bowl with a spatula as needed.  Raise the mixer speed to medium and beat for about two minutes until the batter is really smooth.

Fill your cupcake liners about 2/3 full.  Bake for 15-20 minutes, or until the cupcakes are puffed and set, but not browned, and a toothpick comes out clean.  Remove to a rack to cool.  Make sure the cupcakes are completely cool before you fill or frost them.

To fill the cupcakes, use a small paring knife to cut a small cone-shaped piece out of the top of the cupcake, making sure you don’t cut too close to the bottom of the cupcake.  Spoon salted caramel in to fill the cone.

To make the frosting, mix all ingredients by hand or with a mixer until smooth.  Spread or pipe onto cooled, filled cupcakes.

If desired, drizzle some salted caramel and sprinkle a little bit of sea salt on top of the frosted cupcakes.

This post contains affiliate links. As an Amazon Associate I earn from qualifying purchases.

Tasty Food Photography eBook

Filed Under: recipe Tagged With: baking, buttercream, caramel, chocolate cupcakes, cupcakes, frosting, salted caramel, vanilla cupcakes

Chewy Chocolate Almond Cookies

June 16, 2013 By Becky 2 Comments


Guess what?  In only 20 minutes, you can have rich, chewy chocolate almond cookies with no gluten, no butter or oil, no egg yolks, and no dairy!  It sounds too good to be true, but these cookies are really delicious!

You’ll end up with a couple of egg yolks, which you could save for ice cream.

The bad news is that my bag of almond flour is now almost gone!  I’ll definitely be buying more.  From financiers to mocha brownies to these cookies, it’s my new favorite healthy baking ingredient.  Go get some and make these today!

Note:  You won’t taste the coffee in these cookies–I just added it to bring out the chocolate flavor.  You can leave it out if you want a decaf cookie :0.

Ingredients (adapted from Heather’s Dish):

2 cups almond flour
1/2 cup sugar
2 rounded tablespoons cocoa
1 teaspoon finely ground coffee (optional)
1/4 teaspoon salt
2 egg whites
1/2 teaspoon vanilla
1/4 teaspoon almond extract (optional)

Preheat the oven to 350, and line a cookie sheet with parchment paper.  In a medium bowl, mix together the dry ingredients.  Add the egg whites, vanilla, and almond extract and stir until the dough comes together.

Drop tablespoon-sized balls of dough onto the parchment paper, and flatten the tops slightly with your hand or a spoon (the cookies will not spread much at all while cooking).  Bake for 10-15 minutes, until crisp on the outside but not burned on the bottoms.  Cool on a wire rack.

Filed Under: dessert, gluten free, recipe Tagged With: almond, almond flour, baking, chocolate, cookies, dairy free, healthy

  • « Previous Page
  • 1
  • …
  • 28
  • 29
  • 30
  • 31
  • 32
  • 33
  • Next Page »

Hi, I’m Becky!

Welcome to A Calculated Whisk, where I share creative paleo and gluten-free recipes. Learn more about me here.

Connect with ACW on social media:

  • Email
  • Facebook
  • Instagram
  • Pinterest
  • RSS
  • Twitter

Looking for something?

Subscribe via email and get a free e-book!

Instant Pot Recipes

Instant Pot Colcannon

Instant Pot Colcannon

Instant Pot Balsamic Short Ribs

Instant Pot Tomato Sauce (made with fresh tomatoes)

Instant Pot Short Rib Ragu

Instant Pot Short Rib Ragu

In a hurry? Try these 30-minute recipes:

Burmese Chili Prawns with Cucumber and Avocado Salad (Paleo, Gluten free)

Burmese Chile Prawns with Cucumber and Avocado Salad

Berry Peachy Kale Salad with Candied Pecans

Summer Kale Salad with Peaches and Candied Pecans

Blistered Okra with Garlic and Cumin

Roasted Shrimp and Asparagus with Green Goddess Dressing (Paleo, Whole30)

Roasted Shrimp and Asparagus with Green Goddess Dressing

my healthy aperture gallery
rodelle brand ambassador

Privacy Policy

All text and photographs (c) Rebecca Winkler 2013-2020 unless otherwise noted.

Copyright 2013-2020 Rebecca Winkler · Foodie Pro Theme by Shay Bocks · Genesis Framework · Powered by Wordpress