A Calculated Whisk

Creative paleo and gluten-free recipes

  • Home
  • About Me
    • Photography Portfolio
  • Cookbook
  • Recipe Index
  • Paleo
    • Paleo Eating
    • A Paleo Pantry
  • Blogging
You are here: Home / Archives for uncategorized

Blackberry, Almond, and Rocket Salad with Fresh Mozzarella

July 17, 2013 By Becky 4 Comments

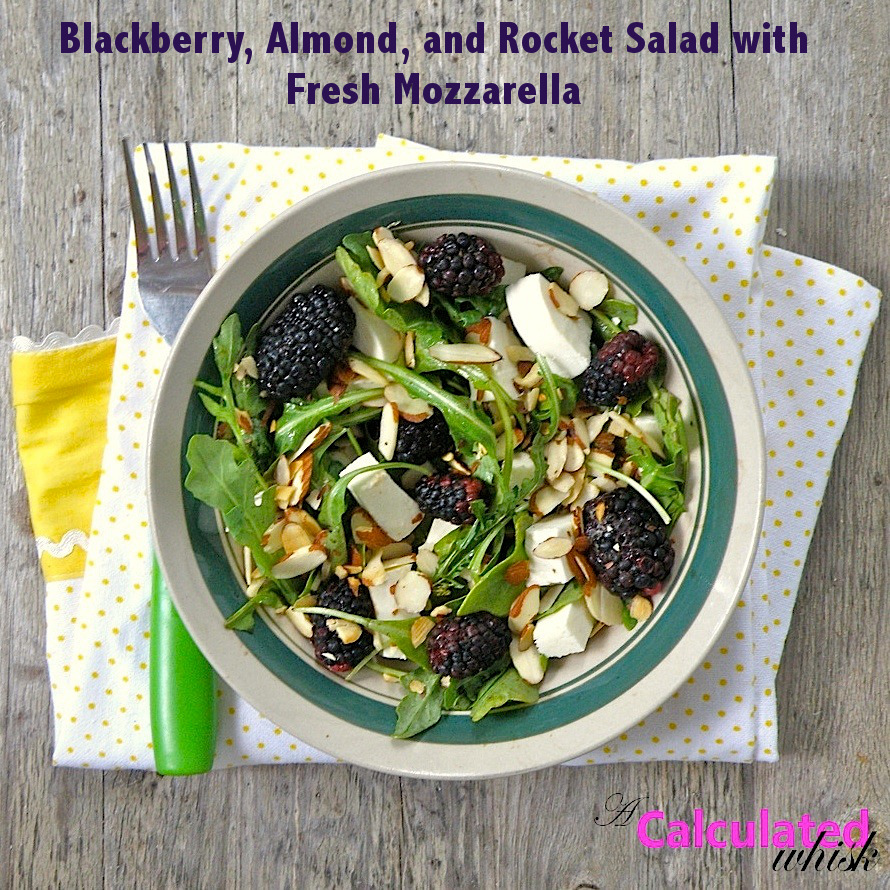
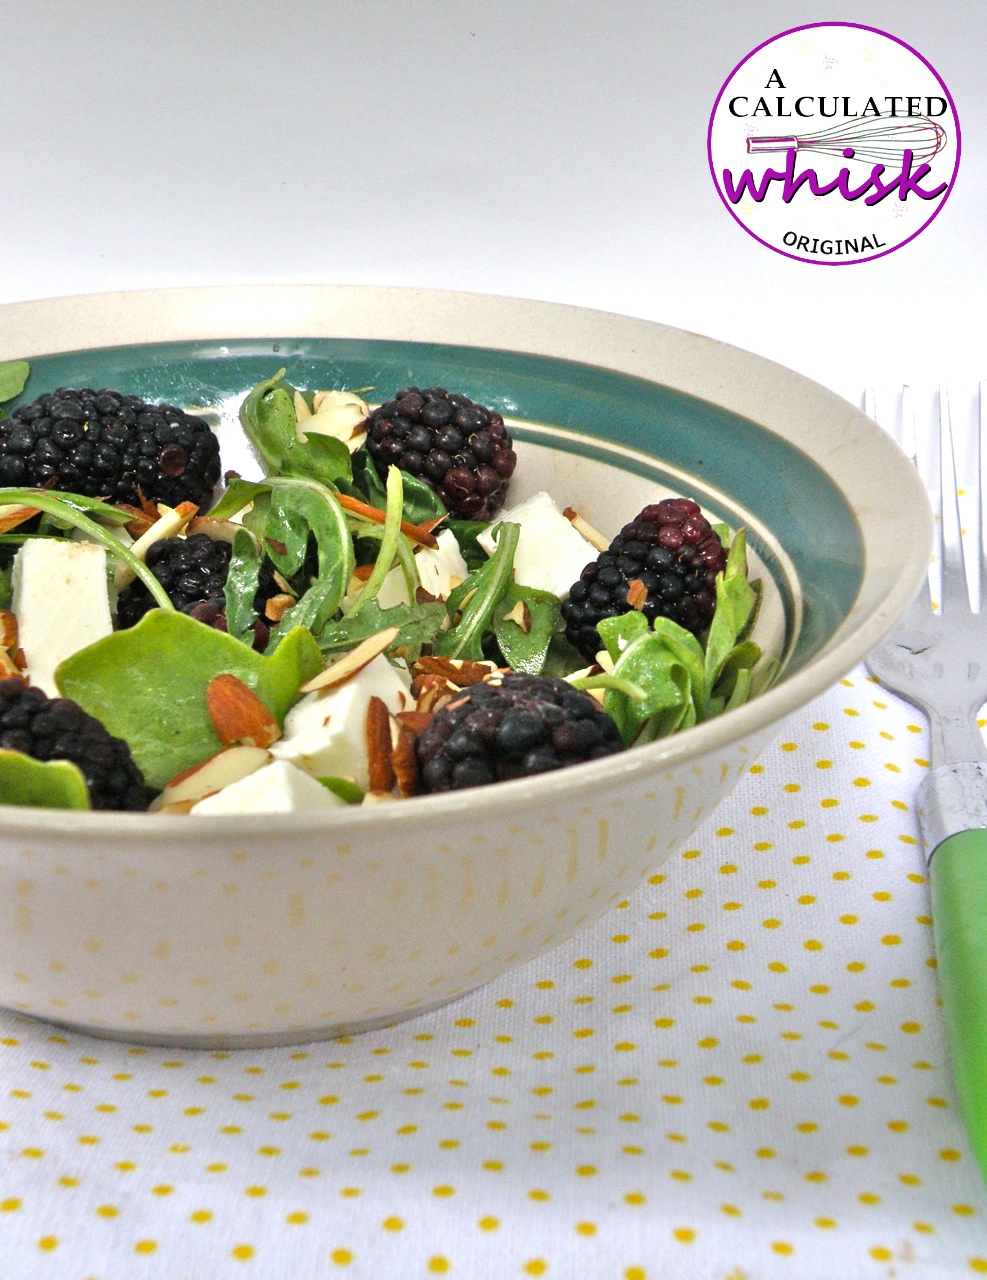
Did you know that arugula is called rocket in the UK?  Arugula is a pretty fun word, but rocket is even better.  This salad has rocket in it, along with all the other delicious things listed in the title.  After making blackberry cupcakes for this month’s Get Your Chef On challenge, I wanted to do something else fabulous with the rest of my juicy blackberries.  I dreamed up this salad, and thought about it all day during class.

I was happy to find that it was even better than I had imagined!  The spicy arugula, sweet blackberries, creamy mozzarella, and toasty almonds are the perfect combination.  This is my new favorite summer salad.  Ben loved it, too!  When I served it he said it looked fancy (secret–any salad with blackberries looks fancy!), and then he asked for seconds.  Usually he’s a one plate of salad kind of guy.

So, here’s what I would recommend.  Go buy a lot of blackberries, make these cupcakes, then make this salad.  A light dinner with a decadent dessert is the perfect thing to have on a summer evening.

Ingredients (serves 2):

1/2 cup sliced almonds
3 cups arugula
2 teaspoons olive oil
1 teaspoon balsamic vinegar
Pinch of sea salt
1 heaping cup blackberries
4 ounces fresh mozzarella, roughly cubed

Toast the almonds in a dry skillet over medium heat, stirring often to make sure they don’t burn, until golden brown (less than five minutes).  Set aside to cool.

Toss the arugula with the oil, vinegar, and salt and adjust seasonings to taste.

To serve, line plate with arugula.  Top with blackberries, fresh mozzarella, and toasted almonds.  Enjoy!

Filed Under: recipe, uncategorized, vegetarian Tagged With: almond, arugula, balsamic vinegar, blackberry, cheese, fresh mozzarella, healthy, low carb, olive oil, salad

Bacon-Wrapped Shrimp with Creamy Rutabaga

July 14, 2013 By Becky 2 Comments

I made you a whole dinner!  This is one of my favorite things to make for my boyfriend–he loves it.  You can also make it with scallops instead of shrimp.  The shrimp or scallops broil wrapped in bacon, which makes them almost impossible to overcook, and they don’t need any other seasonings!  So simple and so delicious.  You only need five ingredients (salt and pepper don’t count)!

If you’ve never tried rutabagas (also known as yellow turnips), I highly recommend them.  This creamy rutabaga is a healthier, more flavorful version of mashed potatoes.  You’re going to love it!  It’s adapted from Ina Garten, and you should check out her version, because it has an amazing crispy shallot topping.  I usually make the crispy shallots, but they take a while and today I was in a bit of a hurry.

I served the shrimp right on top of the creamy rutabaga, with a simple salad on the side.  I plumped some raisins, toasted some pecans, and tossed them with baby arugula, olive oil, balsamic, and a little salt.  The perfect summer dinner!

Ingredients (serves 2-3):

For the bacon-wrapped shrimp:

1/2 pound shrimp (I used 31-40 count per lb), peeled, tails on (or use sea scallops)
8 or so slices of bacon (you need one slice of bacon for every two shrimp or every one or two scallops)
Toothpicks

For the creamy rutabaga:

2 rutabagas
3/4 cup whole milk, heavy cream, or coconut milk
3 tablespoons butter, ghee, or olive oil
Salt and pepper to taste

To prepare the rutabagas, trim and peel them and cut them into 1-inch chunks.  Put them in a saucepan with a generous pinch of salt and water to cover.  Bring to a boil, then reduce the heat and simmer, covered, for about 35 minutes (they should feel tender like cooked potatoes when pierced with a fork).  Drain them, and put them in a food processor with the milk, butter, and some salt and pepper.  Process until smooth.  Taste seasonings and adjust as necessary.

To make the shrimp, preheat the broiler and lightly grease a baking sheet.  Cook the bacon in a skillet over medium heat until it is starting to brown but still very undercooked.  Drain on paper towels.

When the bacon is cool enough to handle, cut each piece in half lengthwise.  Wrap each shrimp with half a piece of bacon, using a toothpick to secure the ends.  If you are using large scallops, you can wrap each one in a whole piece of bacon.  Place the bacon wrapped shrimp on the baking sheet.

Broil for about 3 minutes, then flip the shrimp over and broil for another 3 minutes or until the bacon is crisp and the shrimp are fully opaque.  Scallops may need an additional minute or two if they are large.  Serve hot.

Filed Under: dinner, uncategorized Tagged With: bacon, five ingredients or less, low carb, rutabagas, shrimp

Vietnamese Pork & Vermicelli Bowl

July 7, 2013 By Becky 1 Comment


There are lots of Vietnamese stores and restaurants in my neighborhood.  On lazy days I do all my shopping at Truong Thinh, the Vietnamese market around the corner, and pick up a banh mi for lunch. One of my favorite places to eat is Pho Hoa, where I love to order the House Special Vermicelli Plate (number 90 in case you’re going–Pho Hoa is a chain and there might be one near you!).  It comes with a bunch of delicious things, and rice paper wraps so you can make your own spring rolls.  The first time I ordered it, the waiter brought the rice paper wraps first and Ben and I tried to take a bite of them.  No dice.  They are dry like paper until you soak them in hot water.  Oops.

Anyway, the house special plate comes with those wraps (and a big bowl of hot water to soften them) and vermicelli, herbs and vegetables topped with grilled pork, meatballs, a spring roll, and shrimp & sugarcane.  It also comes with fish sauce on the side.  It’s SO good, and the grilled pork is my favorite.  I don’t know what they do to it.

This dish is my attempt to recreate that dinner at home.  I have to tell you, it’s really good, but it’s not QUITE the same flavor I get at the restaurant.  You should still make it, though.  It’s super yummy and healthy and beautiful (and lots of fun to photograph, if you’re into that).  It has a lot of components, but almost all of them can easily be made in advance.  When it’s time to eat, just cook the pork and put together your bowl!

 
Ingredients (serves 4; adapted from The Culinary Chronicles):
 
For the pork:
 
5 cloves garlic, minced
1 shallot, minced
2 scallions, sliced
4 inch piece of lemongrass, finely minced
3 tablespoons cilantro, chopped
1 tablespoon brown sugar
1 tablespoon honey
2 tablespoons fish sauce
3 tablespoons soy sauce
3/4 to 1 pound pork tenderloin, sliced thinly
 
For the quick-pickled carrots and cucumbers:
 
1 carrot, peeled and cut into matchsticks
1 small cucumber, cut into matchsticks
4 tablespoons rice vinegar (no sugar or salt added)
2 tablespoons sugar
Pinch of salt
 
For the nuoc cham sauce:
 
Juice of 2 limes
1/4 cup fish sauce
1/4 cup sugar
3 tablespoons warm water
1/2 teaspoon chili paste
 
For the scallion oil:
 
1/4 cup vegetable oil
1/2 cup sliced scallions (3-4 scallions)
 
For serving:
 
8 ounces vermicelli, cooked according to package directions
1 head of Boston lettuce, leaves separated
Bunch of cilantro
Fresh bean sprouts (I bought them and forgot to get them out!)
Crushed roasted peanuts
 
To prepare the pork, mix all the ingredients for the marinade together and toss with the pork.  Cover and refrigerate for at least an hour before cooking.
 
To make the quick-pickled vegetables, pour the vinegar, sugar, and salt over the vegetables and toss to coat.  Let sit at room temperature for at least an hour before serving.  If you make them more than a couple of hours in advance, store them in the fridge.
 
For the nuoc cham sauce, mix all ingredients together.  Taste and adjust seasonings as necessary.
 
For the scallion oil, heat the oil in a large skillet over low heat.  When it’s hot, add the scallions and cook until wilted but still bright green, about three minutes.  Pour off the scallions and most of the oil and set aside.
 
Take the pork out of the fridge about ten minutes before you want to cook it.  Prepare the grill, or heat up the same skillet you used for the scallion oil over medium high heat.  Cook the pork, with a little marinade spooned on top, on both sides until browned and cooked through.  Brush cooked pork with the scallion oil before serving.
 
To serve, line a plate or bowl with lettuce leaves and vermicelli.  Top with pickled vegetables, bean sprouts, pork, and roasted peanuts.  Serve with nuoc cham sauce on the side.
 

Filed Under: dinner, recipe, uncategorized Tagged With: Asian, dairy free, healthy, noodles, pork, vermicelli, Vietnamese

Baked Eggs with Parmesan and Chives

June 9, 2013 By Becky 4 Comments


This is the perfect breakfast!  In my opinion, baked eggs are really special.  It’s something about the texture of the whites–they turn into a perfectly smooth, savory custard.  With a rich parmesan crust and a sprinkling of chives, these baked eggs are the best I’ve ever had.

If you’ve never tried baked eggs, go fire up your oven!  I promise you won’t regret it.

Ingredients (per person):

1/2 teaspoon butter
1-2 tablespoons heavy cream
1-2 eggs
Pinch of salt
2 tablespoons freshly grated parmesan cheese
1 teaspoon chopped fresh chives

Preheat the oven to 350.  Place a half teaspoon of butter in the bottom of an individual ramekin, and place it in the oven to melt the butter.

When the butter is melted, remove the ramekin from the oven.  Add a splash of cream.  Add the eggs, being careful not to break the yolks.  Sprinkle the salt, parmesan, and chives on top.

Return the ramekin to the oven and bake for 12 minutes, or until the whites are just almost set (the eggs will continue to cook a little after they come out of the oven).  The yolks will still be runny.  Serve hot with buttered toast.

Filed Under: breakfast, recipe, uncategorized, vegetarian Tagged With: chives, eggs, five ingredients or less, parmesan

Chickpea Mushroom Spread

May 29, 2013 By Becky Leave a Comment

In my last post, I shared a recipe for gambas al ajillo inspired by my meal at Solea.  The other thing I was dying to try at home was Solea’s chickpea spread, which they bring at the beginning of the meal with a basket of crusty bread.  It’s really delicious!  I could tell it had chickpeas in it (plus, it was adorably garnished with one whole chickpea), but I couldn’t tell what made it so much richer, and so different from, hummus.

Luckily, our waiter didn’t mind telling us the other key ingredient–porcini mushrooms!  I had never cooked with them before, and they smelled really funky before they were reconstituted.  But, it was worth it.  I was rewarded with this hearty dip, which I think is just as good as what I had at Solea.

Ingredients (makes about 1 1/2 cups):

1 15 ounce can of chickpeas, rinsed and drained
Juice of half a lemon, or to taste
Salt to taste
1/2 cup plus 1 teaspoon olive oil, plus more for serving
1/4 ounce dried porcini mushrooms
Paprika for serving, optional

Place the porcini mushrooms in a small bowl, and pour in very hot water to cover.  Let sit for 30 minutes.  Drain, reserving the soaking water, rinse, and pat dry.

Heat 1 teaspoon of olive oil in a small skillet over medium heat, and saute the mushrooms for about five minutes.

In a food processor, combine the chickpeas, lemon juice, salt, and mushrooms.  Turn the processor on and add the half cup of olive oil in a steady stream (you can use less oil and more mushroom water if you’d like).  If the spread seems too dry, add the mushroom soaking water a tablespoon at a time and process until smooth.

Taste for seasonings and adjust if needed.  Drizzle with olive oil and sprinkle with paprika, if desired.  Serve with crusty bread or vegetables for dipping.

(function() {
var li = document.createElement(‘script’); li.type = ‘text/javascript’; li.async = true;
li.src = (‘https:’ == document.location.protocol ? ‘https:’ : ‘http:’) + ‘//platform.stumbleupon.com/1/widgets.js’;
var s = document.getElementsByTagName(‘script’)[0]; s.parentNode.insertBefore(li, s);
})();

Filed Under: appetizer, recipe, uncategorized, vegan, vegetarian Tagged With: chickpeas, dip, five ingredients or less, healthy, mushrooms, Spanish, spread

Lentil & Corn Fritters (plus Lentils & Couscous)

May 23, 2013 By Becky 7 Comments

I made lentils the other day, and was really surprised at how good they were.  They were easy to make and flavorful.  We served ours on top of pearl couscous, my new favorite grain product.  It made a great  healthy dinner, and we had tons of lentils left over.
I got the idea to make lentil fritters, and invented the fritter recipe using masarepa
(my other favorite grain product).  If you have leftover lentils, these are very easy and quick to make.  If not, you should make this first recipe and have it for dinner with rice or couscous.  The next day, you can make the fritters with the leftovers.
Ingredients for lentils:
1 pound red lentils, picked over and well washed
1 tablespoon olive oil
1/2 onion, chopped
3 cloves garlic, minced
1/2 teaspoon cumin
4 cups water
1 cube chicken or vegetable bouillon
Salt and pepper to taste
3 tablespoons red or white wine
2 wedges Laughing Cow creamy Swiss cheese (optional)
Chopped scallions and cilantro for garnish
Cooked rice or couscous for serving
Heat the olive oil in a saucepan over medium heat.  Add the onion, garlic and cumin and saute until softened, about five minutes.
Raise the heat the medium high.  Add the lentils, water, and bouillon.  Bring to a boil, then reduce heat and simmer, covered, for about twenty minutes.  The lentils should be tender and lightened in color, with almost all the liquid absorbed.
Add the wine and salt and pepper to taste.  Raise the heat and cook for another 2-3 minutes.  Stir in the cheese, if using, and stir until smooth.
Serve over rice or couscous with scallions and cilantro on top.

Ingredients for the fritters:

1 1/2 cups leftover lentils (from above recipe, or any well-cooked red lentils)
1 cups frozen corn kernels (no need to defrost)
3 scallions, sliced
3 tablespoons chopped cilantro
1 cup masarepa

Sea salt
1 cup hot water
Canola oil or olive oil for cooking
Lime wedges for serving

In a large bowl, mix the leftover lentils, corn, scallions, cilantro, masarepa, and a pinch or two of salt.  Add the hot water and stir to combine.  Let sit for five minutes.

Meanwhile, heat about 1/8 inch of oil in a heavy skillet over medium-high heat.  When the oil is hot enough, a droplet of water should bounce and skitter across the skillet.

Using your hands, make balls of dough a little larger than golf balls and flatten them slightly to form patties.  Fry until golden brown on both sides, about 3 minutes per side.  Be gentle when you flip them–you’ll lose a few pieces of corn, but that’s okay.

Drain on paper towels.  Serve hot, with sea salt sprinkled on top and lime wedges for squeezing over.

Extra uncooked fritter mixture can be kept for up to three days in the refrigerator.


This post contains affiliate links.  If you make a purchase on Amazon after clicking one of my links, I receive a small commission (the price you pay is not affected).  Thank you so much for supporting my site!

Filed Under: appetizer, dinner, recipe, uncategorized, vegan, vegetarian Tagged With: corn, fritters, healthy, lentils, snack

Creamy Beer & Black Bean Queso

May 19, 2013 By Becky Leave a Comment

We had a party last night!  The main feature was the decorate-your-own cupcake station (more on that later).  However, we did have one delicious thing from the savory side–this queso!  I highly recommend it.

This is adapted from a recipe on How Sweet It Is, one of my very favorite food blogs.  I was so excited that Jessica posted this just in time for me to make it for my party!  All the recipes I’ve tried from her site have been fabulous.  Plus, her blog is really fun to read.  I had to take out the chorizo because of all my vegetarian friends.  I’m sure it would be fabulous with sausage, but it’s hard to imagine it being more fabulous than it already is!

This morning, I used the leftover queso to make delicious chilaquiles.  I fried up some onions and garlic, added two eggs and a handful of crushed tortilla chips, and stirred in a few big dollops of this queso.  I served it with sliced avocado, cilantro, and scallions with a squeeze of lime.  Most delicious hangover cure ever!

Ingredients (serves 8 as an appetizer):

2 tablespoons olive oil
1 shallot, diced
2 cloves garlic, minced
1-2 jalapeños, deseeded and diced (I used 1, but the dip was not very hot.  Try 2 for more spice, or use the seeds.)
1 15 ounce can black beans, drained and rinsed
1 1/2 cups beer (your favorite kind–or use a Mexican beer)
1/4 teaspoon cumin
8 ounces cream cheese, softened
12 ounces freshly grated white cheddar cheese
Chopped scallions and cilantro for garnish

Heat the olive oil in a large skillet over medium-low heat.  Add the shallot, jalapeño and garlic and saute until fragrant.  Stir in the black beans, and raise the heat to medium.  Add the beer and cumin and stir to combine.  Cook for five more minutes, until some of the beer has bubbled away.

Add the cream cheese, and stir until melted and the mixture is smooth.  Add the cheddar and stir until smooth and creamy.

Serve with scallions and cilantro on top, and a big basket of chips for dipping.

If the queso hardens up, you can microwave it for a minute or so with a bit of water and stir until it’s creamy again.

(function() {
var li = document.createElement(‘script’); li.type = ‘text/javascript’; li.async = true;
li.src = (‘https:’ == document.location.protocol ? ‘https:’ : ‘http:’) + ‘//platform.stumbleupon.com/1/widgets.js’;
var s = document.getElementsByTagName(‘script’)[0]; s.parentNode.insertBefore(li, s);
})();

Filed Under: appetizer, recipe, uncategorized, vegetarian Tagged With: beer, black bean, cheese, Mexican, queso

Cheese-Bellied Arepas with Guacamole

May 13, 2013 By Becky 2 Comments

This is it!  My favorite arepas recipe so far : ).  When Ben and I went to Orinoco for his birthday, we ordered an arepa stuffed with queso de mano.  I realized two things: first, Orinoco makes their arepas with white cornmeal, which makes them look really elegant, and second, the CHEESE is the most amazing part.  They serve the arepas hot with a big slice of fresh cheese, still cool in the middle.  Amazing!
The arepa we had at Orinoco featured homemade Venezuelan cheese, which I couldn’t find.  But, I thought fresh mozzarella would be the closest thing.  And at the store, I saw burrata, which I’d never tried before.  I got it and it was delicious!  It’s basically fresh mozzarella with creamy curds in the middle.  I tried a piece plain and had to exercise resistance in order to save the rest for the arepas.

See all that cheese?  How can anyone resist?  With a little guacamole on the side (or stuffed inside), these arepas make a great dinner.

Ingredients (makes 6 arepas; serves 2 for dinner or 6 as an appetizer):
1 cup white corn masarepa
1 teaspoon sea salt
1 1/2 cups warm water
Butter for cooking
8 ounces burrata or fresh mozzarella
For the guacamole:
1 ripe avocado, peeled and cubed
Juice of half a lemon, or to taste
1 clove garlic, minced (optional)
2 scallions, sliced
2 tablespoons cilantro, chopped
Salt and pepper to taste
To make the guacamole, combine all the ingredients and mash with a fork.  Add more lemon juice, salt, and pepper to taste.
To make the arepas, mix the masarepa, salt, and water in a bowl and let it sit for five minutes.  Heat the butter in a heavy skillet over medium-high heat.
Form the dough into patties about four inches across and half an inch thick.  When the skillet is very hot, add the arepas and cook until golden brown and blistered on both sides, about 8 minutes per side.
Let the arepas cool for a minute, then slice in half with a sharp knife.  Put a thick slice of burrata in between the two halves, and serve hot with guacamole.

Filed Under: recipe, uncategorized, vegetarian Tagged With: arepas, cheese, guacamole

Make Your Own Vanilla Extract

May 11, 2013 By Becky 2 Comments

Vanilla is such an important ingredient.  It goes into pretty much every dessert I make, and lately I’ve started putting a capful in my morning coffee, too.  Sometimes when I’m baking, the worst thing happens.  I suddenly realize there are only three drops of vanilla left in my little bottle.  This has been happening all too frequently since I developed my vanilla cafe au lait habit, so I decided to put an end to my vanilla extract shortages for good.  I got the idea to make my own vanilla extract from this post on Sunday Morning Banana Pancakes.

All you need are some cute little bottles (I used these), vanilla beans (I got these Madagascar beans), and some vodka.  It doesn’t have to be high quality vodka–the quality of the beans is much more important.  Vanilla beans are expensive, but more reasonable if you buy a bunch of them.  Also, vanilla extract is expensive, so I think if you use enough of it you’ll definitely save money by making your own.  If you don’t want to make all the beans you buy into extract, you can store some in an airtight container to use in baking or custards.  A lot of desserts call for vanilla bean seeds instead of extract, so it’s great to have some around.  As soon as I get my ice cream maker, I am going to use my leftover beans to make vanilla bean ice cream with those great little specks of vanilla seeds in it.

Guess what?  This vanilla extract would make a great gift, and is a gift that keeps on giving.  If you start running low, just top off the vodka and let it sit for a few weeks before using it again.  After doing this a couple of times, you will probably want to add some new beans.  Ina Garten says she’s been doing this to refresh the same bottle of vanilla that’s been in her pantry for twenty years!

Ingredients:

Vanilla beans (6 beans per cup of vodka)
Vodka

Make sure your bottles are really clean.  I sterilized mine by boiling them in water for ten minutes.  Let them dry completely (I put mine in the dishwasher top rack to dry).

Cut each vanilla bean in half lengthwise, and then crosswise to fit in your bottles if you’re using small ones like me.  I used three beans for each of my four-ounce bottles.  Pour in vodka, leaving a little bit of space at the top (if you can find a funnel, you won’t make as much of a mess as I did).  Store in a cool, dark place, and shake every day or so.  The extract will be ready after two months, but continues to develop a more pronounced flavor if aged longer.

I made my labels in Microsoft Word, printed them on regular paper, and stuck them on with a permanent glue stick.  I can’t figure out how to post the document up here for you to download, but if you want these labels, drop me a note with your email address and I’ll send them to you.

Filed Under: uncategorized, vegan, vegetarian Tagged With: DIY, extract, make your own, vanilla

Black Bean & Corn Bisque

May 8, 2013 By Becky 2 Comments

This is a delicious pantry soup, meaning you can make it with ingredients that might already be in your pantry.  It’s healthy and filling, and topped with lots of good stuff.  Also, it comes together in less than half an hour and packs a little mini punch.  Yum!

P.S.  I am calling this a bisque, because it sounds so much fancier than soup.  However, according to Wikipedia, bisques have to be made with seafood stock.  Oh well!  No seafood here, but still delicious.

Ingredients (serves 3-4):

1 tablespoon butter or olive oil
1 1/2 cups frozen corn
1/2 onion, chopped
1 teaspoon garlic paste
Salt and pepper to taste
2 tablespoons olive oil
2 15 ounce cans of black beans
1 teaspoon dried oregano
1 teaspoon cumin
1 packet Sazón Adobo seasoning
A few pinches cayenne pepper, to taste
1 cup water
Splash of silver tequila (optional)
3 tablespoons cream or coconut milk
Chopped fresh cilantro and scallions, for serving

Heat the butter or olive oil in a skillet over medium heat.  Add the onion and corn, and raise the heat to medium high.  Stir in the garlic paste and sprinkle with salt and pepper.  Cook, stirring occasionally, until golden brown, about ten minutes.  Remove from heat and set aside.

In a saucepan, heat the olive oil over medium-high heat.  Add the beans along with their liquid.  Add the oregano, cumin, Adobo seasoning, cayenne, and water.  Stir to combine.  Simmer for ten minutes.  Towards the end of the cooking time, stir in the tequila and let it bubble away for another minute or so.

Remove soup from the heat.  Using a slotted spoon, remove about half of the beans and puree them in a food processor until smooth.  Return the puree to the saucepan, add the cream, and stir to combine.

Serve the soup with a generous scoop of corn and onions, and a sprinkling of scallions and cilantro.

Filed Under: uncategorized, vegetarian Tagged With: black bean, corn, healthy, Mexican, soup

Strawberry & Cream Margaritas

May 5, 2013 By Becky Leave a Comment

You didn’t think I was going to leave you without an idea of which margarita to enjoy with your cupcakes, did you?  I am here for you! 
This is delicious.  I am not sure if it really counts as a margarita, but it has tequila in it.  And it has something on the rim (not salt, but who’s counting?).
Ingredients (makes two servings):
1 cup frozen strawberries
1 cup coconut milk
4 ice cubes
2-3 shots silver tequila
Squeeze of lemon or lime juice, plus extra
1/2 teaspoon vanilla
2-3 tablespoons honey (for a paleo-friendly version) or agave nectar (for a vegan version)
Sugar for glasses
Blend all ingredients except the sugar in a blender until smooth.  Taste, and add more lemon juice or agave nectar (or tequila!) if desired.
Dip the rims of two glasses into lemon juice and then sugar.  Pour into the glasses and enjoy!
¡Salud!

Filed Under: drinks, uncategorized, vegan Tagged With: cinco de mayo, cocktails, coconut, margarita, Mexican, strawberry

Breakfast Arepas with Guacamole

May 4, 2013 By Becky 2 Comments

Here’s the perfect Cinco de Mayo breakfast!  Arepas (my favorite thing ever since I made these), eggs, and guacamole.  These are pretty quick to throw together, and very filling and satisfying.  Plus, who doesn’t love a chance to make guacamole first thing in the morning?  I know I do!

I was excited to try arepas with some shredded cheese mixed into the batter, but once they were cooked I didn’t really notice the cheese.  Oh well.  Next up in my all-arepas-all-the-time series, I’ll be trying arepas with a big chunk of cheese stuffed in the middle.  Cheese-bellied arepas, if you will.  Stay tuned!  I won’t make you wait long, I promise.

Ingredients (serves four):

For the arepas:
1 cup masarepa
(precooked fine yellow or white cornmeal)
1/2 teaspoon sea salt
1 1/2 cups warm water
1/2 cup shredded cheese (optional)
Butter for cooking

For the guacamole:
1 ripe avocado
1 clove garlic, minced
2 scallions, thinly sliced
2 tablespoons chopped fresh cilantro
Juice of one lime
Salt and pepper to taste

4 eggs, poached or fried
Salt and pepper

To make the guacamole, place all ingredients in a bowl and mash with a fork until combined but still chunky.

For the arepas, mix the masarepa, salt, and water and let sit for 5 minutes.  Heat some butter in a skillet over medium-high heat.  Mix the cheese into the batter, then form patties about four inches across and half an inch thick.  Fry until golden and crisped on both sides, about 10 minutes.

Spoon a generous layer of guacamole on top of a hot arepa, then top with an egg.  Sprinkle with salt and pepper and serve hot.


Filed Under: breakfast, recipe, uncategorized, vegetarian Tagged With: arepas, avocado, eggs, guacamole

  • « Previous Page
  • 1
  • …
  • 4
  • 5
  • 6
  • 7
  • Next Page »

Hi, I’m Becky!

Welcome to A Calculated Whisk, where I share creative paleo and gluten-free recipes. Learn more about me here.

Connect with ACW on social media:

  • Email
  • Facebook
  • Instagram
  • Pinterest
  • RSS
  • Twitter

Looking for something?

Subscribe via email and get a free e-book!

Instant Pot Recipes

Instant Pot Colcannon

Instant Pot Colcannon

Instant Pot Balsamic Short Ribs

Instant Pot Tomato Sauce (made with fresh tomatoes)

Instant Pot Short Rib Ragu

Instant Pot Short Rib Ragu

In a hurry? Try these 30-minute recipes:

Caprese Frittata

Caprese Frittata

Sheet Pan Salmon and Delicata Squash

Roasted Shrimp and Asparagus with Green Goddess Dressing (Paleo, Whole30)

Roasted Shrimp and Asparagus with Green Goddess Dressing

Caramelized Salmon with Basil Chile Oil and Quick-Pickled Vegetables (Paleo, Gluten free)

Caramelized Salmon with Basil Chile Oil and Pickled Vegetables

my healthy aperture gallery
rodelle brand ambassador

Privacy Policy

All text and photographs (c) Rebecca Winkler 2013-2020 unless otherwise noted.

Copyright 2013-2020 Rebecca Winkler · Foodie Pro Theme by Shay Bocks · Genesis Framework · Powered by Wordpress