A Calculated Whisk

Creative paleo and gluten-free recipes

  • Home
  • About Me
    • Photography Portfolio
  • Cookbook
  • Recipe Index
  • Paleo
    • Paleo Eating
    • A Paleo Pantry
  • Blogging
You are here: Home / Archives for recipe / breakfast

Veggie Hash & Eggs

August 2, 2013 By Becky 4 Comments

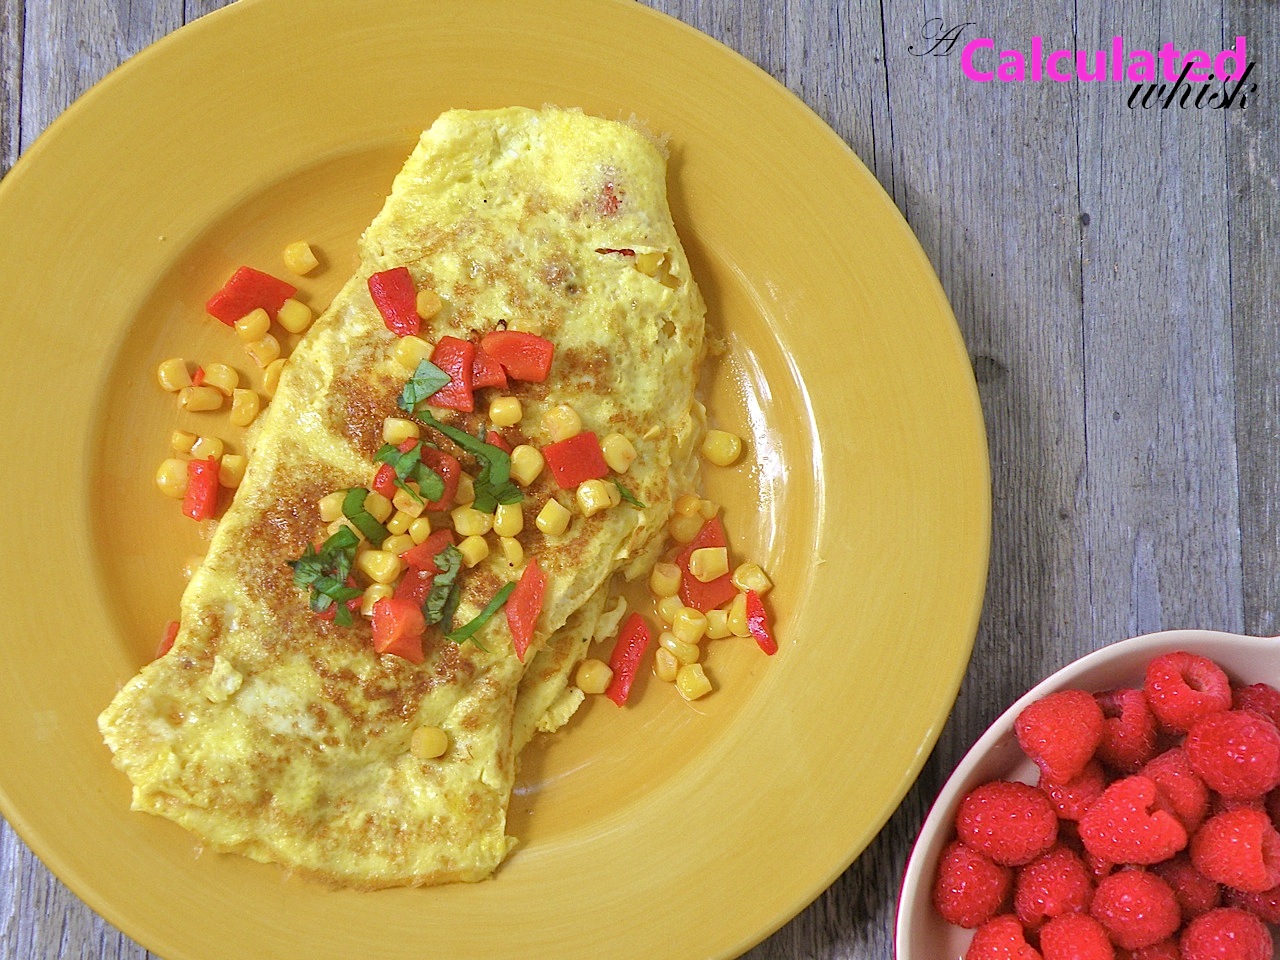
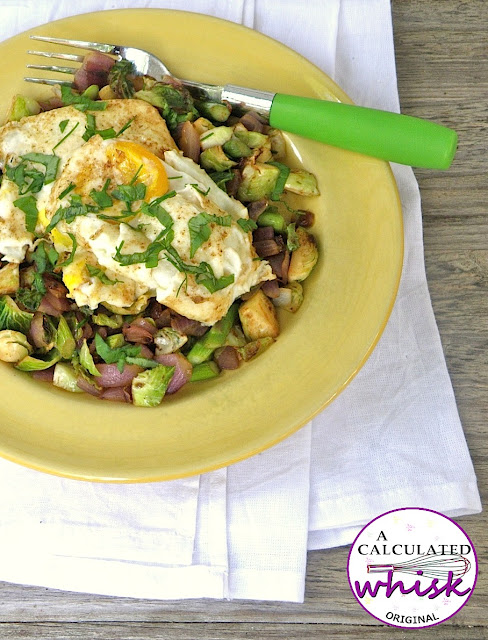
This morning when I woke up, I wanted to do something a little different with my eggs.  When I saw the vegetables we had in the fridge (asparagus and Brussels sprouts), I started to wonder why some vegetables are a common find at breakfast time, while some are not.  Mushrooms, peppers, and onions are often seen as omelette fillings, but Brussels sprouts not so much.

Read More…

Filed Under: breakfast, gluten free, paleo, recipe, vegetarian, whole30 Tagged With: asparagus, Brussels sprouts, eggs, healthy, low carb, onions, vegetables

Strawberry Banana Pancakes

July 23, 2013 By Becky Leave a Comment

The almond flour pancakes I made a few days ago were so good that I was eager to try another version of paleo pancakes.  This time, I was inspired by a cinnamon banana pancake recipe in Easy Paleo Diet Recipes, and added a twist to make them even better.

Do you have a favorite diner?  Mine is the Maugus, which is just down the street from my mom’s apartment in my hometown.  It’s run by a big Greek family, and the hardest part of being a regular there is when they close for three weeks every summer to go to Greece.  They are closed right now and I have to tell you, it has been rough.  One of my favorite things to get there is pancakes–their pancakes are HUGE!  I’m a big fan of both the strawberry and the banana pancakes.  They have nice rounds of freshly sliced fruit cooked right in.  They will even make you pancakes with both strawberries AND bananas if you can’t decide.  And, if you are not into fruity pancakes (who are you and why are you still reading?) you can get chocolate chip pancakes or cinnamon walnut french toast.

Anyway, inspired by the Maugus, I put sliced strawberries into these banana pancakes.  The banana is mashed up with the batter so the pancakes do not have a strong banana flavor, but they are pleasantly reminiscent of banana bread.  And if you have never tried sliced strawberries in your pancakes, you HAVE to.  They are cooked just to the point of being fabulously juicy, and it is much more exciting than just putting sliced strawberries on top of your pancakes.  Trust me.

Since I am doing the Whole 30 for real now, I omitted the honey from the original recipe.  However, with the bananas and the strawberries, I thought these pancakes were sweet enough.  I ate mine with the extra banana and strawberry slices on top and a little butter, and my boyfriend enjoyed his with some syrup.

Ingredients (serves 2; makes 6-7 pancakes):

1 and 1/2 cups almond flour
1/3 cup mashed banana (about half a medium banana–slice the rest to serve with the pancakes)
3 tablespoons coconut oil
2 tablespoons coconut milk
4 eggs
Pinch of salt
1/4 teaspoon cinnamon
1/2 teaspoon vanilla
1/2 teaspoon baking soda

1 and 1/2 cups fresh strawberries, thinly sliced, plus extra for serving
Butter or coconut oil for cooking

Combine all the ingredients except the strawberries in a food processor and process until smooth.  Heat some oil or butter in a small, heavy skillet over medium heat.  When the skillet is hot (a drop of water will dance across the surface), add about 1/4 cup of batter.  Place some strawberry slices on top.  Cook until many bubbles have formed on the surface (the bottom should be browned).  Carefully slide a large spatula under the pancake and flip it quickly.  If you flip these pancakes too soon or use a small spatula, you may lose some of your strawberries during the turn.  Cook for a minute or less on the second side, until browned and cooked through.  Add more oil or butter before cooking a second pancake.  Top with fresh fruit and butter if desired and serve hot.

This post contains affiliate links. As an Amazon Associate I earn from qualifying purchases.

Filed Under: breakfast, gluten free, paleo, recipe, uncategorized Tagged With: almond flour, banana, dairy free, pancakes, strawberry

Asparagus Bundles with Bacon & Poached Eggs

July 22, 2013 By Becky 1 Comment


Can you think of a non-dessert ingredient that isn’t better wrapped in bacon?  It’s hard, right?  Ever since making these shrimp, I have been wanting to wrap all things in bacon.  Here is a great way to start.

This recipe is paleo, and dairy and gluten-free.  It’s got a lot of asparagus and some good protein, so I’m calling it healthy.  Besides, it’s beautiful, delicious, and easy.  The hardest part is waiting for it to roast.

You can make this without the eggs for an elegant side dish that would go well with a steak or almost any dinner I can think of.  This would also be great for a weekend brunch, and I just enjoyed it immensely for my Monday lunch.  Try it!  It looks fancy, and everyone you feed it to will love you for wrapping their veggies up in bacon.

Ingredients (serves 4; adapted from How Sweet It Is):

2 cloves garlic, minced
1 tablespoon coconut oil
1 tablespoon sesame oil
1 bunch asparagus, ends trimmed
4 slices thick-cut bacon
1 tablespoon roasted sesame seeds
4 eggs, poached or fried (I use these adorable poach pods)
Salt to taste

Preheat the oven to 400.  In a small bowl, mix together the garlic, coconut oil, and sesame oil.

Line a baking sheet with foil or parchment and place a rack on top.  Divide the asparagus spears into four equal bundles, and wrap each one with a piece of bacon.  Place the bundles on the rack with the ends of the bacon underneath so it stays put.

Brush the garlic and oil mixture over the bundles, then sprinkle with sesame seeds.  Bake for 35-40 minutes, or until the bacon is crisp.  Top with the eggs, sprinkle with a little salt, and serve.


This post contains affiliate links. As an Amazon Associate I earn from qualifying purchases.

Filed Under: breakfast, gluten free, paleo, recipe, whole30 Tagged With: asparagus, bacon, dairy free, eggs, low carb, sesame

Almond Pancakes with Blueberry Compote (Paleo, Gluten-free)

July 21, 2013 By Becky Leave a Comment

Pancakes!  The perfect breakfast food.  When I spotted a recipe for almond flour pancakes in one of the paleo cookbooks I picked up, I was eager to try it.  Surprisingly, these pancakes are a lot like regular pancakes.  Since the batter is made in the food processor, it’s nice and smooth without any noticeable chunks of almond.  These pancakes also make a hearty and high-protein breakfast since the recipe calls for four eggs.  With the blueberry compote and a few sliced almonds on top, you will be in your pancake happy place.  I’m starting to think regular flour is totally superfluous!

Ingredients (makes 6 large pancakes; serves 2):

For the blueberry compote:

1 and 1/2 cups fresh or frozen blueberries (I used frozen)
2 tablespoons water
1 teaspoon honey, or to taste
Pinch of salt
1/4 teaspoon vanilla

For the almond pancakes (adapted from Easy Paleo Diet Recipes):

1 and 1/2 cups almond flour
1/4 cup coconut milk
1/4 cup coconut oil
1 tablespoon honey
1/2 teaspoon vanilla
Pinch of salt
1/2 teaspoon baking soda
4 eggs

Butter or coconut oil for cooking
Sliced almonds, for serving

To make the blueberry compote, place all ingredients in a saucepan.  Cook over medium heat, stirring occasionally, until some of the blueberries have collapsed and the liquid is syrupy, 10-15 minutes.  Set aside to cool.

To make the pancakes, process all ingredients in a food processor until smooth.  Heat the butter or coconut oil in a skillet over medium heat, and add about 1/4 cup of batter.  Cook the pancake until the top is covered with bubbles.  Flip and cook until golden on the other side.  Add a little more butter or oil before cooking the next pancake.

Serve hot with blueberry compote and sliced almonds.


This post contains affiliate links. As an Amazon Associate I earn from qualifying purchases.

Filed Under: breakfast, gluten free, paleo, recipe, uncategorized Tagged With: almond, blueberry, low carb, pancakes

Paleo Poached Eggs with Creamy Spinach

July 18, 2013 By Becky 4 Comments


Okay, big news. A Calculated Whisk is going paleo for one month. There. I said it. Now if I go and try to post some kind of insane ice cream cupcake cookie sandwich, you guys will call me out on it. Right?

Nobody tells you this, but the ugly downside of starting a food blog is you EAT so much of the delicious food you make that your figure kind of falls by the wayside. I love desserts, obviously, but you can only have so much. It’s time for a change. In the past I’ve lost a lot of weight following the Zone diet, but this time I wanted to try something different.

I’ve been hearing so much about paleo, and it makes sense to me that eating the foods we evolved eating would be the healthiest way to go. I checked out this website for the Whole 30, and thought I would give it a try. I got The 30 Day Guide to Paleo Cooking: Entire Month of Paleo Meals
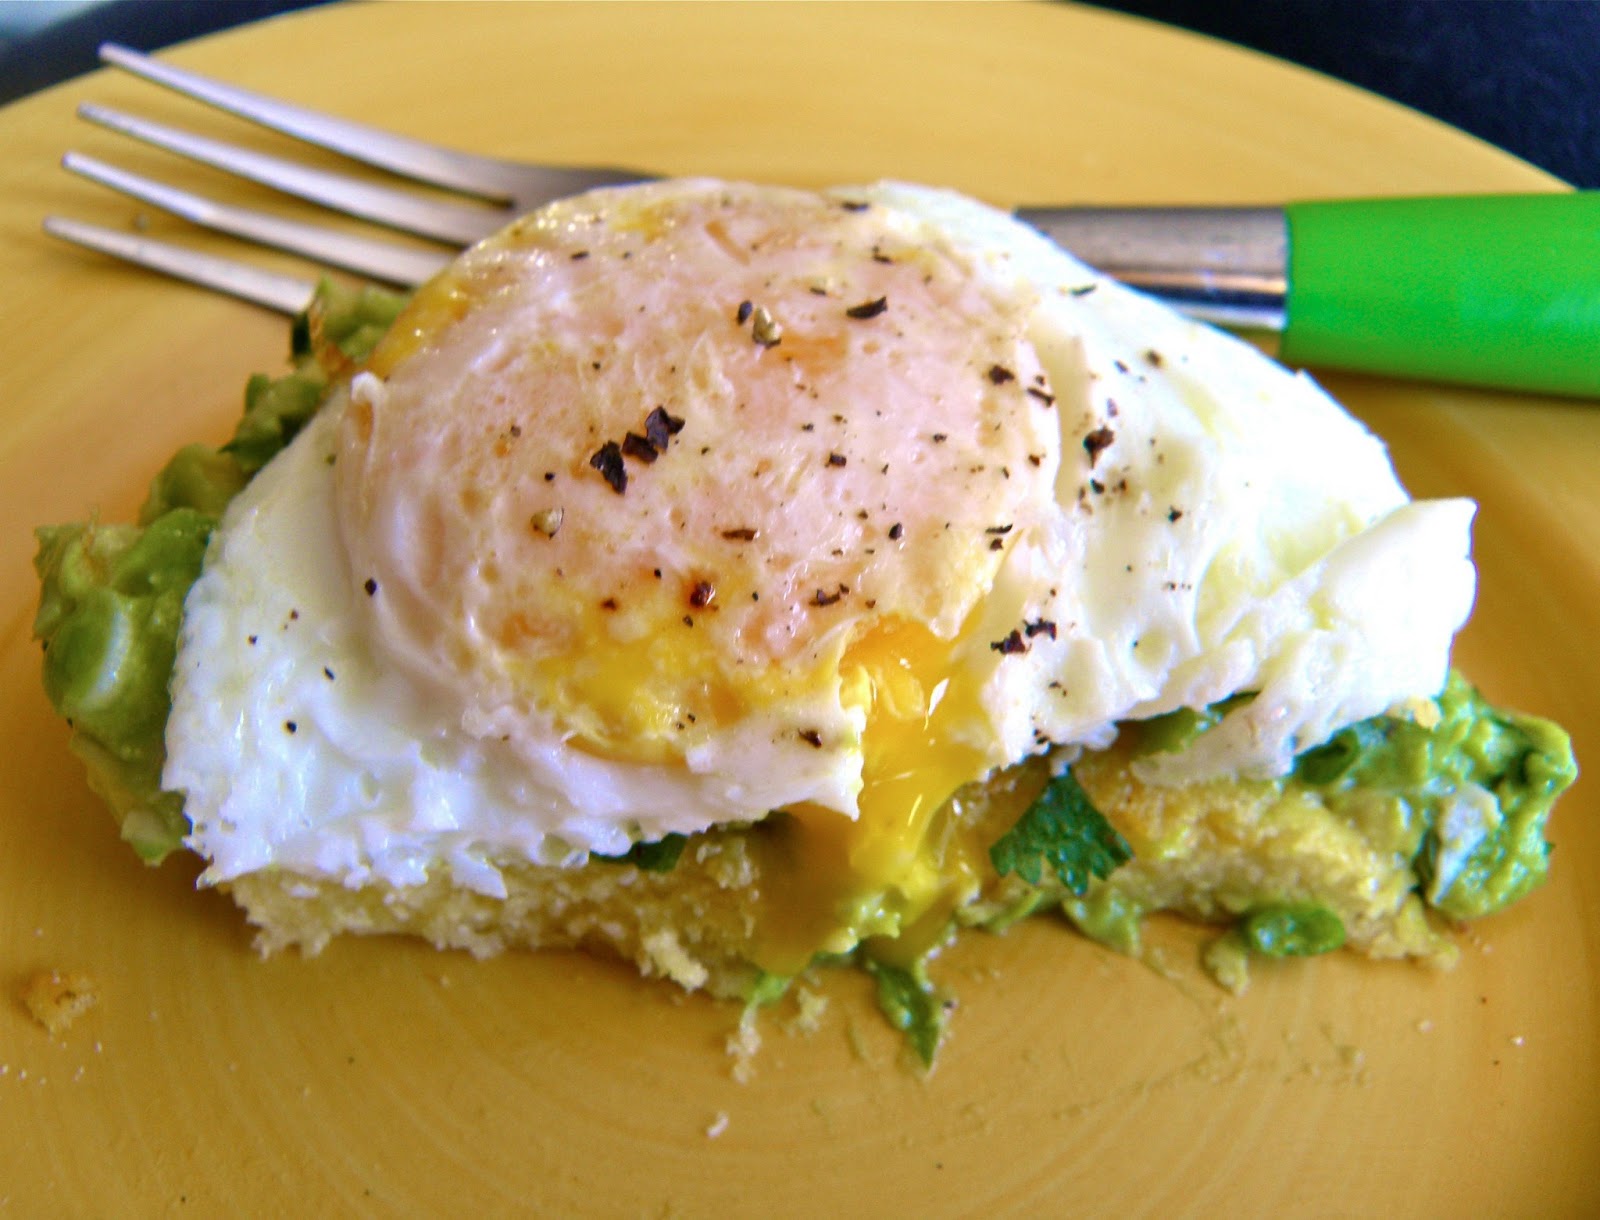
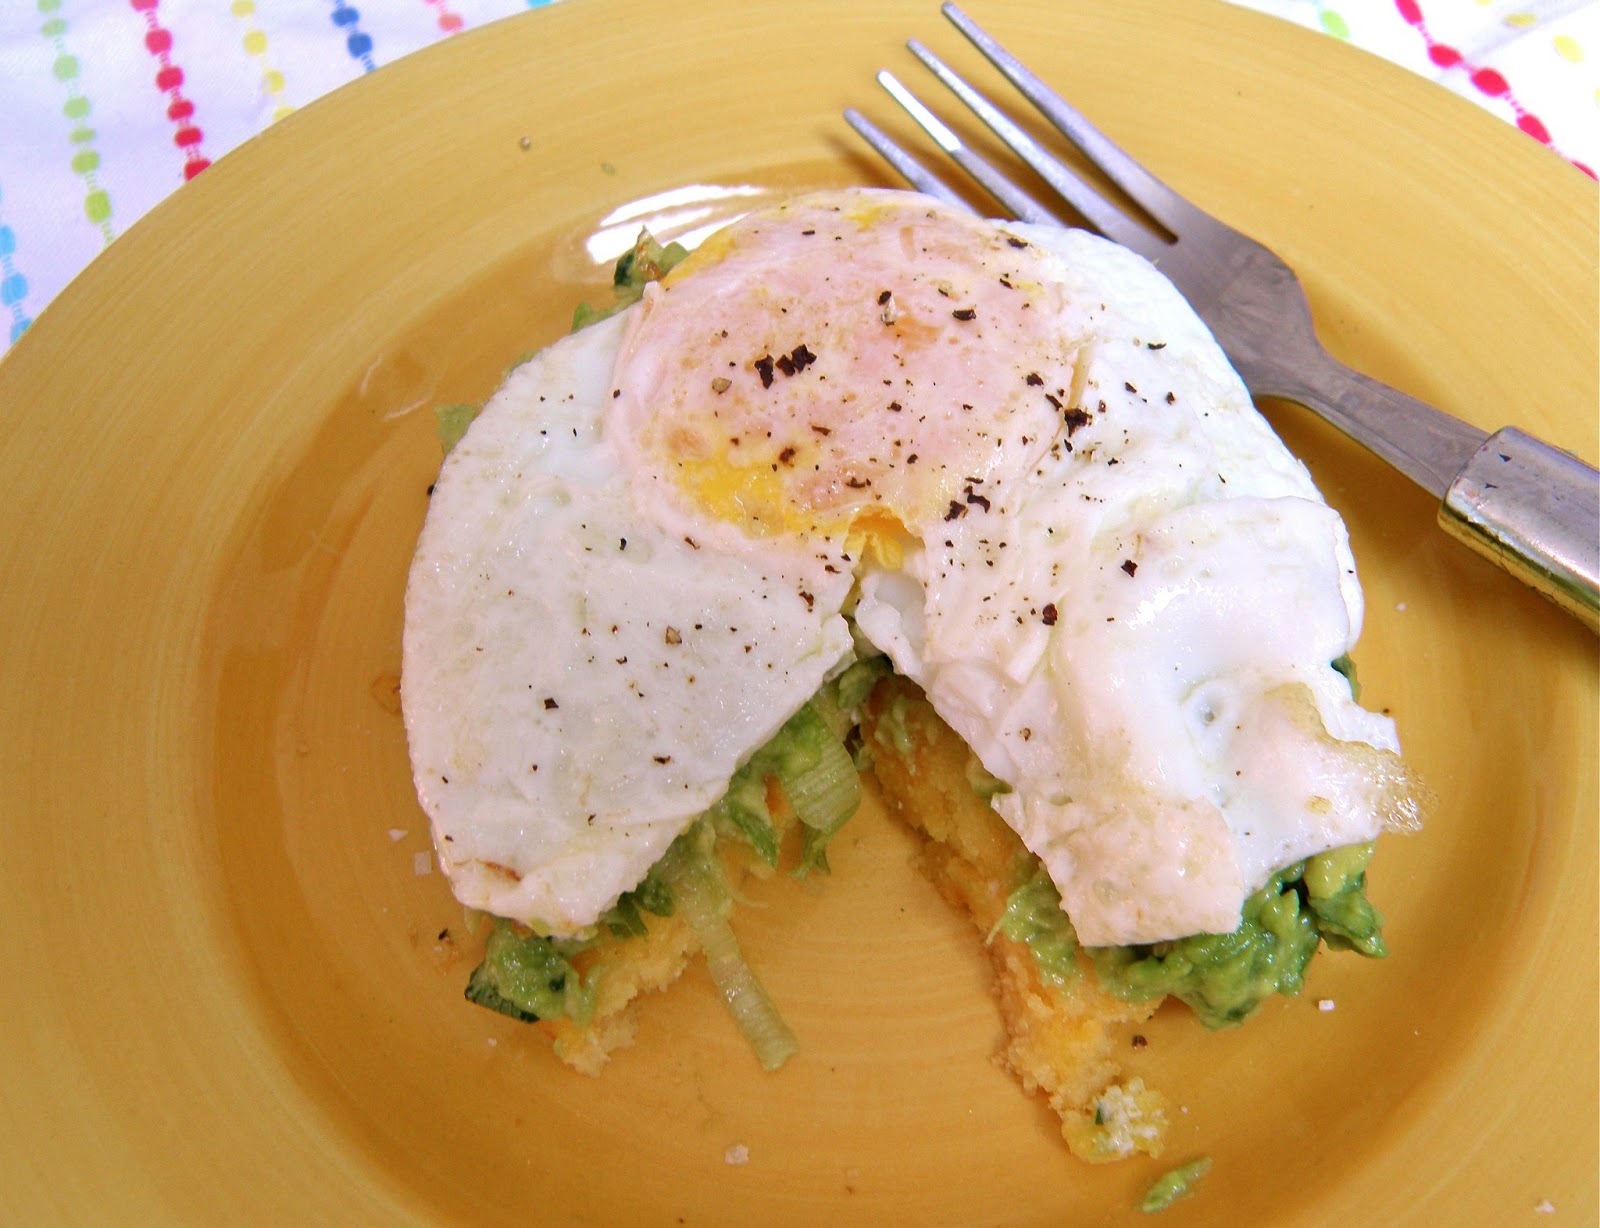
, and I’m ready to go. The book is great, but I always think it’s more fun to create my own recipes. So, here it is! My first paleo breakfast. It tastes great, and I didn’t feel like anything was missing since it’s so filling, rich, and creamy.

Oh, and by the way! I’m on an exercise program, too. I’ve started barre3‘s 28 to Great. That’s six days of workouts a week (they have an awesome online library of 10, 30, 40, and 60 minute videos) for four weeks. I’ve done two workouts so far, and they are exhausting. It’s really targeted muscle work and I can tell it’s going to have an impact.


Phew.  This is a lot of changes, but I hope you guys will support me and try some of the recipes.  Let’s start with the most important meal of the day.
 
Ingredients (serves one):
 
2 teaspoons coconut oil, plus extra
2 eggs
2 cloves garlic, minced
2 cups baby spinach (or more!)
2 teaspoons coconut milk or cream
Salt and pepper to taste
 
In a large skillet, heat the coconut oil over medium low heat.  Add the garlic and saute until it starts to brown.  Turn the heat up to medium high, add the spinach, and season with salt and pepper to taste.  Cook the spinach, tossing frequently, until just wilted, 3-5 minutes.  Turn off the heat and stir in the coconut milk or cream.
 
Meanwhile, poach your eggs.  See this post about how to do it on Smitten Kitchen, or use an egg poacher.  I greased the cups of my egg poacher with a little bit of coconut oil.
 
When the spinach is ready, make it into a nest on your plate.  Slide the finished eggs into the nest, sprinkle with more salt if desired, and serve hot.
 

This post contains affiliate links. As an Amazon Associate I earn from qualifying purchases.

Filed Under: breakfast, paleo, recipe, vegetarian, whole30 Tagged With: coconut, dairy free, eggs, five ingredients or less, healthy, low carb, spinach

Brie Omelette with Roasted Red Pepper, Corn, and Fresh Basil

July 5, 2013 By Becky Leave a Comment


We grow a few herbs on the porch, including basil.  It’s so much fun to go out there and grab a few leaves of something for whatever I’m cooking.  Today, I was inspired by the leftover brie and roasted red pepper and decided to make them into an omelette with a little corn.  How could I make this omelette even better? I wondered.

Fresh basil!  I was right.  I think the fresh basil is what takes this from good to great.

A note about omelettes (mine, at least): they are not photogenic.  First of all, I broke my favorite square white plate while getting ready to photograph this.  All the rest of my big plates are yellow, which isn’t the best background for eggs.  But also, I struggle to make my omelettes fold right and look pretty.  Any tips?

I think part of the problem is the fact that I’m too lazy to make one omelette for me and one for my boyfriend, so I insist on making one gargantuan omelette for us to share.  It’s just too BIG to be pretty.

At least it’s not too big to be delicious!

Ingredients (serves 2):

2 tablespoons butter, divided
1/3 cup fresh or frozen corn kernels
1 roasted red pepper*, peeled, trimmed, deseeded, and chopped
4 eggs
Splash of milk
Salt and pepper to taste
3 ounces brie, cut into thick slices
Handful of fresh basil leaves, julienned**

Heat one tablespoon of butter in a large skillet over medium heat.  Saute the corn with a little salt and pepper until heated through.  Add the red pepper and cook for another minute or so.  Put the vegetables in a bowl and set aside.

Wipe out the skillet and heat the rest of the butter over medium heat.  In a small bowl, whisk together the eggs and milk with some salt and pepper.  When the skillet is hot, pour in the egg mixture.

Let the omelette set for a couple of minutes, then add the vegetables (reserving some for the garnish if desired), brie, and basil.  When the eggs are almost set, fold the two sides of the omelette into the middle (I have no tips on doing this elegantly.  Don’t worry, it will taste good even if it turns into a scramble).  Cook for another minute or so, then flip onto a plate, garnish with reserved vegetables and more basil, and enjoy hot.

Share this omelette with someone special!  Or, decide you need the lumberjack special and eat it all yourself :).

*If you have a gas stove, you can roast peppers stovetop!  Place the pepper directly on the burner with the flame on high.  Turn frequently with tongs until it’s collapsed and charred on all sides.  If you don’t have a gas stove, preheat your oven to 500 or your broiler, put a little oil on the pepper, and roast on a cookie sheet, turning frequently, until it’s deflated and well-charred.  Place the pepper in a bowl and cover.  Steaming the pepper like this makes it easier to peel.  When it’s cool enough to handle, peel the pepper under cold running water.  Use in this omelette, or for pasta, pizza, or a topping for cheese and crackers.

**To julienne basil, stack the leaves on top of each other.  Roll them up, and slice into thin strips on the diagonal using a sharp knife.

Filed Under: breakfast, recipe, vegetarian Tagged With: basil, brie, cheese, corn, eggs, omelette, red pepper, roasted red pepper

Dairy-Free Lemon Curd

June 25, 2013 By Becky 24 Comments

 
Dairy-Free Lemon Curd
 
This dairy-free lemon curd is a lighter version of the classic. It’s still packed with irresistible sweet citrus flavor!
 
My dad and sister came over for dinner this weekend.  It was so much fun–my sister just turned 15, and she had never been to my apartment before!  I cooked them a belated birthday/father’s day celebratory dinner.  
 
We had thai shrimp curry with vegetables and coconut milk (so good–recipe coming soon), a salad my dad brought with a delicious dressing (I’ll try to score the recipe and post it–it involves hazelnut oil!) and a berry tart with coconut cream and dairy-free lemon curd.  My sister can’t eat any dairy, so I had to make lemon curd without the butter.  Good news–it’s just as delicious as the original, and even more lemony.
 
Dairy-Free Lemon Curd
 
I wanted to share the whole tart recipe with you, but the crust still needs some work.  Anyone have a good dairy-free tart crust recipe?  I’m going to work on getting one ready for the Fourth, because this tart happens to be very patriotic.  For the topping, we just whipped up some coconut cream with powdered sugar and vanilla, then folded it in to the lemon curd.
 
Dairy-Free Lemon Curd
 
Anyway, I couldn’t wait to share this delicious lightened-up lemon curd with you.  It’s a healthier way to enjoy my favorite spread!  Try it on pancakes or a dutch baby, swirl it with some greek yogurt, or pipe it inside some cupcakes.
 
If you’re looking for the original buttery version, it’s here.
 
Dairy-Free Lemon Curd

Dairy-Free Lemon Curd

Yield: 1 1/2 cups
Prep Time: 10 minutes
Cook Time: 15 minutes
Total Time: 25 minutes

This dairy-free lemon curd is a lighter version of the classic. It's still packed with irresistible sweet citrus flavor!

Ingredients

  • 4-6 organic lemons
  • 
1/2-3/4 cup sugar, to taste
  • Pinch of salt
  • 
2 eggs
  • 1 egg yolk
  • 1/2 teaspoon vanilla extract (optional)

Instructions

  1. Wash your lemons really well, and zest two of them. Mix the zest with the sugar in a small bowl, rubbing the mixture between your fingers to bring out the flavors of the zest (use 1/2 cup of sugar for a very puckery curd, and more if you want things a little sweeter). Set the lemon sugar aside (if you want to make extra lemon sugar, it's also delicious as a topping for muffins or cookies).
  2. Roll the lemons firmly under the palm of your hand to prime them to release the most juice. Juice lemons until you have 3/4 cup of lemon juice. Strain out any seeds. Add the juice, lemon sugar, and salt to a saucepan. Warm over medium heat, stirring constantly, until all the sugar is dissolved.
  3. Beat the eggs and egg yolk together in a medium bowl. While whisking constantly, slowly pour the warm lemon mixture into the eggs. Continue to beat for a minute or so.
  4. Return the mixture to the saucepan and cook over low heat, whisking constantly, until the mixture thickens, about 10-15 minutes. Remove from the heat and stir in the vanilla (the vanilla is optional--you won't really taste it, but it rounds out the flavor).
  5. Let the curd cool to room temperature, then transfer to a glass jar or another airtight container. Store in the refrigerator. Lemon curd will keep, refrigerated, for up to two weeks.

Notes

Recipe adapted from Genius Kitchen

© Becky Winkler
Cuisine: British

Filed Under: breakfast, dessert, recipe Tagged With: dairy free, lemon, lemon curd, preserves, spread, tart

Baked Eggs with Parmesan and Chives

June 9, 2013 By Becky 4 Comments


This is the perfect breakfast!  In my opinion, baked eggs are really special.  It’s something about the texture of the whites–they turn into a perfectly smooth, savory custard.  With a rich parmesan crust and a sprinkling of chives, these baked eggs are the best I’ve ever had.

If you’ve never tried baked eggs, go fire up your oven!  I promise you won’t regret it.

Ingredients (per person):

1/2 teaspoon butter
1-2 tablespoons heavy cream
1-2 eggs
Pinch of salt
2 tablespoons freshly grated parmesan cheese
1 teaspoon chopped fresh chives

Preheat the oven to 350.  Place a half teaspoon of butter in the bottom of an individual ramekin, and place it in the oven to melt the butter.

When the butter is melted, remove the ramekin from the oven.  Add a splash of cream.  Add the eggs, being careful not to break the yolks.  Sprinkle the salt, parmesan, and chives on top.

Return the ramekin to the oven and bake for 12 minutes, or until the whites are just almost set (the eggs will continue to cook a little after they come out of the oven).  The yolks will still be runny.  Serve hot with buttered toast.

Filed Under: breakfast, recipe, uncategorized, vegetarian Tagged With: chives, eggs, five ingredients or less, parmesan

Breakfast Arepas with Guacamole

May 4, 2013 By Becky 2 Comments

Here’s the perfect Cinco de Mayo breakfast!  Arepas (my favorite thing ever since I made these), eggs, and guacamole.  These are pretty quick to throw together, and very filling and satisfying.  Plus, who doesn’t love a chance to make guacamole first thing in the morning?  I know I do!

I was excited to try arepas with some shredded cheese mixed into the batter, but once they were cooked I didn’t really notice the cheese.  Oh well.  Next up in my all-arepas-all-the-time series, I’ll be trying arepas with a big chunk of cheese stuffed in the middle.  Cheese-bellied arepas, if you will.  Stay tuned!  I won’t make you wait long, I promise.

Ingredients (serves four):

For the arepas:
1 cup masarepa
(precooked fine yellow or white cornmeal)
1/2 teaspoon sea salt
1 1/2 cups warm water
1/2 cup shredded cheese (optional)
Butter for cooking

For the guacamole:
1 ripe avocado
1 clove garlic, minced
2 scallions, thinly sliced
2 tablespoons chopped fresh cilantro
Juice of one lime
Salt and pepper to taste

4 eggs, poached or fried
Salt and pepper

To make the guacamole, place all ingredients in a bowl and mash with a fork until combined but still chunky.

For the arepas, mix the masarepa, salt, and water and let sit for 5 minutes.  Heat some butter in a skillet over medium-high heat.  Mix the cheese into the batter, then form patties about four inches across and half an inch thick.  Fry until golden and crisped on both sides, about 10 minutes.

Spoon a generous layer of guacamole on top of a hot arepa, then top with an egg.  Sprinkle with salt and pepper and serve hot.


Filed Under: breakfast, recipe, uncategorized, vegetarian Tagged With: arepas, avocado, eggs, guacamole

Make Your Own Lemon Curd (and welcome to my blog)

March 28, 2013 By Becky Leave a Comment

Hi, I’m Becky and this is my new blog.  The
first recipe I’m going to share with you is for homemade lemon curd.
While you may not think you need to make this unless you’re planning on
hosting a high tea, I’m going to try to convince you that you actually
need to make it right now.  This stuff is ridiculously delicious, plus
easy and fun to make.  I made mine to pipe inside the lemon coconut
cupcakes I’m making for Easter dinner, but I’m worried I might have to
make a second batch.  I’ve been sneaking spoonfuls at every opportunity,
and my boyfriend and I each had a generous dollop on the Dutch babies I
made for breakfast this morning (recipe for that is here).
If you love lemon like I do, you have to try this!  It would be
fabulous on scones.  I’ve never made scones, but will have to try it if I
end up with any lemon curd left at all.

This recipe is adapted from Ina’s, in the Barefoot Contessa cookbook and here.
I reduced the sugar, and think mine has the perfect balance of sweet
and tart flavors.  She says you can make this with oranges or limes
instead of lemons—let me know if you try it!


Ingredients (makes about two cups):

4 lemons, at room temperature

1 cup sugar

4 extra-large eggs, at room temperature

1/4 pound butter (1 stick) at room temperature

Generous pinch of salt


1.   Zest the lemons, avoiding the white
pith underneath the yellow rind (I usually scrape each spot across the
grater twice).  Place the zest in a food processor with the sugar, and
process thoroughly to break the zest up into tiny pieces.

2.   Juice the lemons (roll them under the palm of your hand first so
they’ll release more juice) until you have 1/2 cup of lemon juice.  I
had to use all four lemons to get that much juice.

3.   Cream the butter with the lemon sugar (I used my stand mixer
with the paddle attachment).  Add the eggs one at a time, and then the
lemon juice and salt.  Mix well.

4.   Transfer the mixture to a saucepan.  At this point, it probably
looks like a big mess.  Mine looked like curdled milk.  Maybe lemon curd
is named after its gruesome looks at this stage in the process? Don’t
worry though, your lemon curd will smooth right out as soon as it heats
up.

5.   Cook the lemon curd over low heat, stirring constantly, until it
thickens (10-15 minutes).  I used a thermometer to keep tabs on
things—my lemon curd thickened around 155 degrees, and you don’t want to
let yours get much above 175.

That’s it!  You made lemon curd.  Now, try not to just eat all of it
with a spoon.  I cooled mine and poured it into jars—it will keep for a
couple of weeks in the refrigerator, although I can’t see it ever
lasting that long at my apartment.  Tomorrow I’ll be piping mine into
some springtime coconut cupcakes—I’ll let you know how it goes and share
the recipe soon!

Filed Under: breakfast, recipe Tagged With: DIY, five ingredients or less, lemon, make your own

  • « Previous Page
  • 1
  • …
  • 3
  • 4
  • 5

Hi, I’m Becky!

Welcome to A Calculated Whisk, where I share creative paleo and gluten-free recipes. Learn more about me here.

Connect with ACW on social media:

  • Email
  • Facebook
  • Instagram
  • Pinterest
  • RSS
  • Twitter

Looking for something?

Subscribe via email and get a free e-book!

Instant Pot Recipes

Instant Pot Colcannon

Instant Pot Colcannon

Instant Pot Balsamic Short Ribs

Instant Pot Tomato Sauce (made with fresh tomatoes)

Instant Pot Short Rib Ragu

Instant Pot Short Rib Ragu

In a hurry? Try these 30-minute recipes:

Paleo Potato Hummus with Crudités

Grain-free Crepes with Apricot Preserves

Ribeye Steak with Chimichurri Butter

Ribeye Steak with Chimichurri Butter + FREE Grass-fed Ribeyes

Grilled Shrimp Skewers with Creamy Sesame Slaw (Gluten free, Paleo)

Grilled Shrimp Skewers with Creamy Sesame Slaw

my healthy aperture gallery
rodelle brand ambassador

Privacy Policy

All text and photographs (c) Rebecca Winkler 2013-2020 unless otherwise noted.

Copyright 2013-2020 Rebecca Winkler · Foodie Pro Theme by Shay Bocks · Genesis Framework · Powered by Wordpress